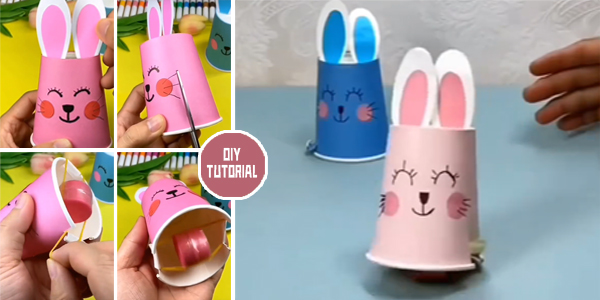
DIY projects often bring out the creative side in us, and what could be more delightful than making your own DIY Easter Bunnythat not only looks cute but also runs! With just a few simple materials, you can create a charming little bunny that will hop its way into everyone’s hearts.
YOU MAY ALSO LOVE: 5 Easter Bunny Keychain Crochet Patterns – FREE
To start off, gather the materials you’ll need: a disposable paper cup, some pieces of paper, a rubber band, two bottle caps, and transparent tape.
1. Begin by drawing the adorable features of a bunny on the paper cup. Think of cute eyes, a little nose, and a happy smile to give your bunny character.
2. Next, cut out small pieces of paper to use as the bunny’s rosy cheeks and draw whiskers on them. Attach these to the sides of the paper cup.
3. Now, create the bunny’s ears using more paper. Attach them to the bottom of the paper cup, positioning them to look like bunny ears.
4. Take the two bottle caps and glue them together to form the bunny’s wheels.
5. . Insert the glued bottle caps into the rubber band, and then wrap a strip of transparent tape around the circumference of the caps to ensure they spin smoothly.
6. Use scissors to cut the top of the paper cup and fold it upwards slightly. Wrap the rubber band and bottle caps assembly around the cup.
7. Now, the fun part! Start rotating the rubber band and watch as your little bunny begins to run on its wheels. Adjust the tension of the rubber band to control the speed of your bunny’s run.
With a few simple steps and a bit of imagination, you’ve created your very own DIY Easter Bunny that not only looks adorable but also has a playful trick up its sleeve. This DIY project is not only fun to make but also a delightful addition to any Easter celebration, bringing joy and laughter to all who witness the bunny’s charming run.
