Tag Archives: kids craft

DIY Easter Origami Bunny Tutorial

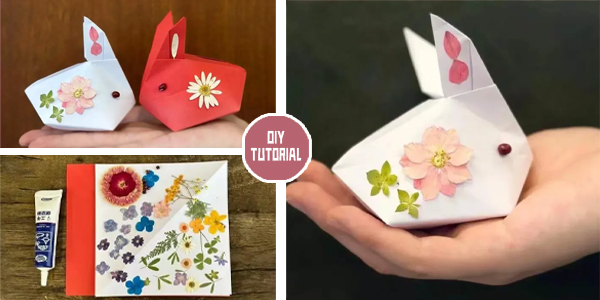
Origami, the ancient Japanese art of paper folding, offers endless possibilities for creating beautiful and intricate designs with just a simple piece of paper. In this tutorial, we will explore how to make an adorable DIY Easter Origami Bunny  , perfect for Easter decorations or as a delightful handmade gift. With just a few folds and a touch of creativity, you can bring this charming bunny to life.

To begin, gather the necessary tools: square paper, dried flowers (optional for decoration), and glue.

Step by step tutorial for  DIY Easter Origami Bunny:

1. Start by preparing your square paper and laying it flat on a clean surface.

2. Fold the paper diagonally to create a triangle, creasing along the fold to mark the center.

3. Fold the left and right corners of the triangle towards the center, forming two smaller triangles at the bottom.

4. Take the bottom corners of the two smaller triangles and fold them backward, creating a pointed shape.

5. Next, fold the top point of the triangle downwards, creasing it firmly.

6. Fold the two side corners of the triangle inwards, aligning them with the center crease.

7. Tuck the folded corners into the slots created by the previous folds, securing them in place.

8. Flip the paper over and fold the bottom corners of the triangle upwards, creating the bunny’s feet.

9. Fold the top point of the triangle downwards once again, shaping it into the bunny’s head.

10. Using the creases as a guide, fold the bunny’s ears outward, giving them a cute and floppy appearance.

11. Finally, add a touch of whimsy to your origami bunny by decorating it with dried flowers or other embellishments. Simply apply a small amount of glue to the desired area and carefully attach the decorations.

Voila! Your DIY Easter origami bunny is complete, ready to bring joy and charm to any Easter celebration or decoration. This simple yet delightful craft is sure to impress with its intricate folds and playful design. So gather your materials, unleash your creativity, and enjoy the satisfying process of creating your very own origami masterpiece. Happy folding!
YOU MAY ALSO LOVE: DIY Origami Mini Tote Bag Tutorial

DIY Origami Pearl Crown Tutorial

Sharing is Caring:

DIY Happy Swinging Bunny Tutorial

Are you ready to embark on a delightful crafting journey? Let’s dive into creating a Happy Swinging Bunny! With just a few simple materials and a touch of creativity, you can bring this adorable bunny to life and add a sprinkle of joy to any space. Follow along with these step-by-step instructions to craft your own charming swinging bunny decoration:

1. To begin, gather a circular piece of cardstock. Fold it neatly in half, forming a perfect semi-circle. This will serve as the base of your swinging bunny’s crib, providing stability and support for the whimsical creation to come.

2. Now, it’s time to fashion the bunny’s head. Take another circular piece of cardstock and carefully cut out the shape of bunny ears from a fresh sheet of cardstock. These ears will give your swinging bunny its distinctive charm and personality.

3. For the bunny’s hands, use two small circular pieces of cardstock. These will be attached to the swinging mechanism, allowing your bunny to playfully sway back and forth.

4. With the basic structure in place, it’s time to add some color and character to your swinging bunny. Grab a paintbrush and gently brush on vibrant hues to the bunny’s ears, infusing them with life and vibrancy. Then, affix eyes, a cute little nose, and any other decorative elements you desire to give your bunny its unique flair.

5. To complete the look, adorn the semi-circle cardstock base with whimsical plant decorations. Whether it’s colorful flowers, lush greenery, or tiny mushrooms, these additions will elevate your swinging bunny’s charm and create a delightful scene for it to inhabit.

Voila! With a few simple steps, your DIY Happy Swinging Bunny is ready to spread joy and cheer wherever it goes. Hang it in a nursery to enchant little ones, display it in a cozy corner of your home to brighten up your day, or gift it to a loved one as a token of your affection. Get creative with colors, patterns, and decorations to make your swinging bunny truly one-of-a-kind. Enjoy the process of crafting and let your imagination run wild as you bring this charming creation to life!

Here is the video tutorial for  DIY Happy Swinging Bunny:


YOU MAY ALSO LOVE:   DIY Christmas Star Tree Tutorial

DIY Easter Paper Chicken Egg Tutorial

Sharing is Caring:

DIY Easter Paper Chicken Egg Tutorial

Are you looking for a fun and creative Easter craft project? Look no further! With just a few simple materials, you can create adorable DIY Easter Paper Chicken and eggs to decorate your home for the holiday. Here’s a step-by-step tutorial to guide you through the process:

Materials Needed for DIY Easter Paper Chicken:

Disposable paper plate
Raffia
White cardstock
Colored cardstock
Feathers
Scissors
Permanent marker

Instructions:

1. Start by drawing a cute chicken shape on the white cardstock.
2. Use scissors to carefully cut out the chicken shape.
3. Next, draw several egg shapes on the colored cardstock.
4. Cut out the egg shapes with scissors.
5. Draw a small chick shape on the colored cardstock.
6. Cut out the chick shape with scissors.
7. Draw a circle on a piece of paper and cut it in half (creating a semicircle).
8. Use the semicircle to cover the front of the disposable paper plate.
9. Insert the chicken, chick, eggs, and raffia into the semicircle and the paper plate.
10. Make two holes in the back of the paper plate and thread a thin string through them.
11. Your lovely Easter paper chicken egg decoration is now complete!

This  DIY Easter Paper Chickenproject is perfect for kids and adults alike. You can customize your paper chickens and eggs with different colors and patterns to suit your Easter decor theme. Whether displayed as table centerpieces or hung as festive decorations, these charming creations are sure to add a touch of whimsy to your Easter celebrations. So gather your materials and get ready to craft your way to a hoppy Easter!

You may also love: Christmas Booties Free Crochet Patterns

DIY Easter Paper Plate Egg Tutorial

Sharing is Caring:

DIY Concrete Easter Candles Tutorial

Looking for a unique and creative way to celebrate Easter? Why not try making your own DIY Concrete Easter Candles? With just a few simple materials and some easy steps, you can create beautiful candles that will add a touch of charm to your Easter decor. Here’s how to do it:

Materials Needed for DIY Concrete Easter Candles:

Eggs
Concrete mix
Toothpicks
Candle wicks
Candle wax (soy wax, beeswax)

Step by step tutorial:

1. Start by carefully hollowing out the eggs, leaving only the eggshells intact. Be gentle to avoid breaking the shells.

2. Mix the concrete according to the ratio of water to concrete (100:45). Once mixed thoroughly, pour the concrete into the hollowed-out eggshells. Allow them to dry for at least 12 hours.

3. Prepare your candle wax by melting it in a double boiler or by using a microwave. If using a combination of soy wax and beeswax, melt them together in a 1:1 ratio and allow the mixture to cool slightly.

4. Attach the candle wicks to toothpicks and place them in the center of each concrete-filled eggshell, using the toothpicks to support the wicks upright.

5. Carefully pour the melted candle wax into each eggshell, ensuring that the wicks remain centered. Allow the wax to cool and solidify completely.

6. Once the wax has hardened, gently crack and remove the eggshells to reveal your beautifully crafted Easter candles.

Here is the video tutorial for DIY Concrete Easter Candles:

These DIY concrete Easter candles are not only a fun project to make, but they also make for lovely decorations or gifts during the Easter season. So gather your materials and get creative this Easter!

YOU MAY ALSO LOVE:  10+ Knitted Flower Free Patterns

DIY Christmas Star Tree Tutorial

Sharing is Caring:

DIY Easter Bunny that Runs (Video Tutorial)

DIY projects often bring out the creative side in us, and what could be more delightful than making your own DIY Easter Bunnythat not only looks cute but also runs! With just a few simple materials, you can create a charming little bunny that will hop its way into everyone’s hearts.

YOU MAY ALSO LOVE: 5 Easter Bunny Keychain Crochet Patterns – FREE

DIY Easter 3D Egg Template

DIY Paper Plate Bunny Tutorials

To start off, gather the materials you’ll need: a disposable paper cup, some pieces of paper, a rubber band, two bottle caps, and transparent tape.

1. Begin by drawing the adorable features of a bunny on the paper cup. Think of cute eyes, a little nose, and a happy smile to give your bunny character.
2. Next, cut out small pieces of paper to use as the bunny’s rosy cheeks and draw whiskers on them. Attach these to the sides of the paper cup.
3. Now, create the bunny’s ears using more paper. Attach them to the bottom of the paper cup, positioning them to look like bunny ears.
4. Take the two bottle caps and glue them together to form the bunny’s wheels.
5. . Insert the glued bottle caps into the rubber band, and then wrap a strip of transparent tape around the circumference of the caps to ensure they spin smoothly.
6. Use scissors to cut the top of the paper cup and fold it upwards slightly. Wrap the rubber band and bottle caps assembly around the cup.
7. Now, the fun part! Start rotating the rubber band and watch as your little bunny begins to run on its wheels. Adjust the tension of the rubber band to control the speed of your bunny’s run.

With a few simple steps and a bit of imagination, you’ve created your very own DIY Easter Bunny that not only looks adorable but also has a playful trick up its sleeve. This DIY project is not only fun to make but also a delightful addition to any Easter celebration, bringing joy and laughter to all who witness the bunny’s charming run.

Sharing is Caring:

DIY Heart Ferris Wheel Video Tutorial

Looking to add a touch of whimsy and romance to your décor? Why not try your hand at crafting a charming DIY Heart Ferris Wheel! This delightful project combines the elegance of origami with the fun of construction, resulting in a whimsical centerpiece that’s sure to steal hearts. Follow along with our step-by-step video tutorial to bring this enchanting creation to life.

YOU MAY ALSO LOVE:  DIY Origami Mini Tote Bag Tutorial

DIY Valentine Paper Wreath Tutorials

Easy DIY Paper Rose Tutorial

1. To begin, gather your materials: 15x15cm origami paper for folding eight 3D hearts. Follow the detailed instructions in the video to create these intricate heart shapes, each a symbol of love and affection.

2. Next, take another piece of 15x15cm white paper and fold it into eight slender sticks. Secure the folds with tape or glue, forming the framework for your Ferris wheel.

3. Carefully insert each heart onto a stick, securing them in place with glue or tape. Watch as your Ferris wheel begins to take shape, the hearts spinning gently in the breeze.

4. Now, fashion a base for your Ferris wheel by cutting a piece of cardboard and wrapping it with origami paper. Use four of the sticks as supports, attaching them securely to the base.

5. Create a central axis for your Ferris wheel by rolling a piece of paper into a sturdy tube and inserting it into the designated hole. Secure it in place with glue, ensuring it remains upright.

6. Using the remaining stick, thread it through the holes in the supports, anchoring the Ferris wheel securely in place.

7. Finally, let your creativity soar as you embellish your DIY Heart Ferris Wheel with additional decorations. Add glitter, sequins, or ribbons to personalize your creation and make it truly one-of-a-kind.

With your DIY Heart Ferris Wheel complete, display it proudly as a whimsical centerpiece at weddings, parties, or romantic evenings at home. Let its gentle spin and heartfelt design serve as a reminder of the joy and love that surrounds us.

Sharing is Caring:

DIY Sock Snowman Turorial

There are many methods and materials for making a snowman, such as crocheting a snowman, knitting a snowman, sewing a snowman, and making a snowman from a cup. . . We introduced snowman making with balloons and yarn the other day. . . Today we are sharing how to make a DIY Sock Snowman with socks. This sock snowman is very small and cute. This tutorial is very simple and very suitable for children to DIY, come and learn together.

For this DIY Sock Snowman project , what you will need:

Two pairs of socks, scissors, cotton (or rice), thread, glue and buttons

1. First, we prepare a pair of white socks that we don’t wear. Cut it with scissors. 

2. Put stuffing (cotton, rice, etc.) in the socks and choose the material yourself. Tighten the sock with a string.

3. Put a piece of rope into the stuffed socks and divide it into the head and body of the snowman. 

4. Take a pair of unused red socks with Christmas elements and cut them open. 

5. Put the cut red socks on the snowman’s body as the snowman’s clothes. It can be stuck with glue (glue gun). I

6. Use another part of the red socks on the snowman’s head. As the snowman’s hat, you can stick it with glue (glue gun) and tie the gap with a rope. 

7. On the snowman’s face (white socks), make the eyes and nose (you can use small beads of different colors, small buttons, etc.). You can even paint a little blush on the snowman with makeup. 

8. Sew the buttons on the snowman’s clothes as the buttons of the snowman’s clothes. So our snowman is ready.  More DIY crafts HERE.

Sharing is Caring:

DIY Cute Owl Out of Recycled Paper Bag

The ancient Greeks revered the owl as a symbol of Athena and wisdom. In Japan, the owl is called the bird of luck, and has also become the mascot of the Nagano Winter Olympics, representing good luck and happiness. Today we are going to learn how to DIY Cute Owl out of recycled paper bags. This DIY project is also great for kids, I think they will have a great time!

You may also like: Easy-diy-paper-rose-tutorial

For make this DIY cute owl , what you will need:

2 recycled paper bags, colored papers, scissors, pens, glue

The step-by-step tutorial is as follows:

1. First we prepare a recycled paper bag, you can choose the most common paper bag. And cut off the handle of the paper bag. 

2. We prepare a piece of yellow paper, use scissors to cut out a shape similar to an eye patch, and use white paper to cut out a shape similar to a gear. 

3. Continue to use blue paper and pink paper to cut into circles. 

4. On the pink circle, draw the shape of a closed eye. 

5. Use all kinds of colored paper, cut it into a circle, fold it in half and put it under the paper bag as the owl’s feathers. And fold out a triangle for the owl’s beak. Take another paper bag and use scissors to cut out the owl’s ears. 

6. Use scissors to cut out the shape of the owl’s wings, and draw the pattern of feathers on it. Here you can play your personality freely. 

7. Put all parts in the proper position. 

8. Make the owl’s feet at the bottom. Such a recycled paper bag owl is complete. Do you like it?

Sharing is Caring: