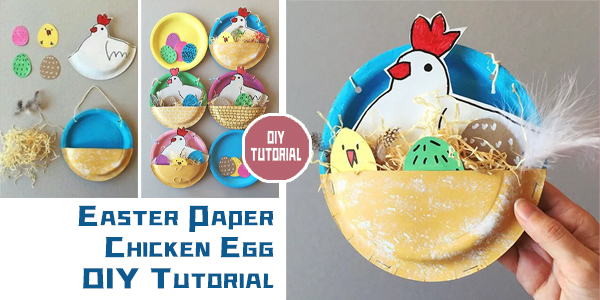
Are you looking for a fun and creative Easter craft project? Look no further! With just a few simple materials, you can create adorable DIY Easter Paper Chicken and eggs to decorate your home for the holiday. Here’s a step-by-step tutorial to guide you through the process:
Materials Needed for DIY Easter Paper Chicken:
Disposable paper plate
Raffia
White cardstock
Colored cardstock
Feathers
Scissors
Permanent marker
Instructions:
1. Start by drawing a cute chicken shape on the white cardstock.
2. Use scissors to carefully cut out the chicken shape.
3. Next, draw several egg shapes on the colored cardstock.
4. Cut out the egg shapes with scissors.
5. Draw a small chick shape on the colored cardstock.
6. Cut out the chick shape with scissors.
7. Draw a circle on a piece of paper and cut it in half (creating a semicircle).
8. Use the semicircle to cover the front of the disposable paper plate.
9. Insert the chicken, chick, eggs, and raffia into the semicircle and the paper plate.
10. Make two holes in the back of the paper plate and thread a thin string through them.
11. Your lovely Easter paper chicken egg decoration is now complete!
This DIY Easter Paper Chickenproject is perfect for kids and adults alike. You can customize your paper chickens and eggs with different colors and patterns to suit your Easter decor theme. Whether displayed as table centerpieces or hung as festive decorations, these charming creations are sure to add a touch of whimsy to your Easter celebrations. So gather your materials and get ready to craft your way to a hoppy Easter!

One thought on “DIY Easter Paper Chicken Egg Tutorial”
Comments are closed.