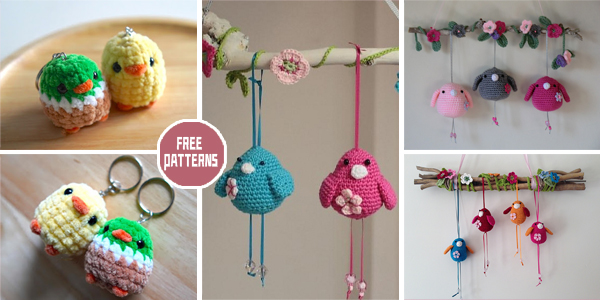
Crocheting is an art form that transcends generations, cultures, and interests. From intricate shawls to cozy blankets, the possibilities are endless. However, there’s something uniquely charming about crafting tiny creatures, especially when they emulate the innocence and delicacy of baby birds. The allure of creating these adorable creatures with nothing more than yarn and a crochet hook has captivated crafters worldwide. In this essay, we’ll explore the enchanting world of crocheted baby birds, focusing on two delightful FREE patterns available online. Special thanks to all the designers who generously shared these free Baby Bird Crochet patterns! To access them, just scroll down the page and click on the link below the corresponding image. Happy crafting!
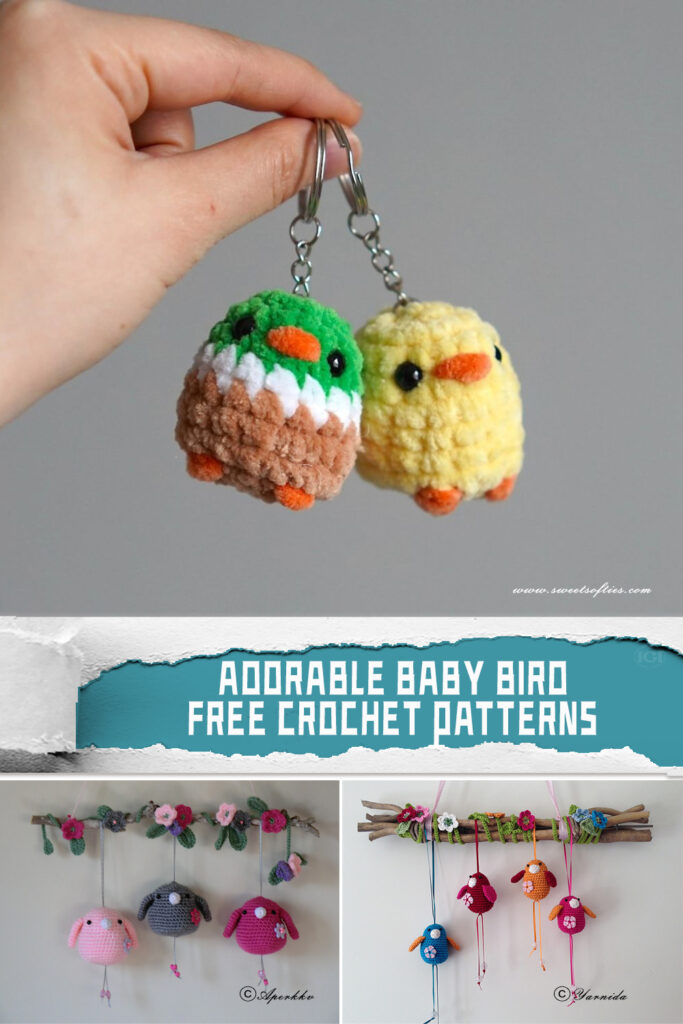
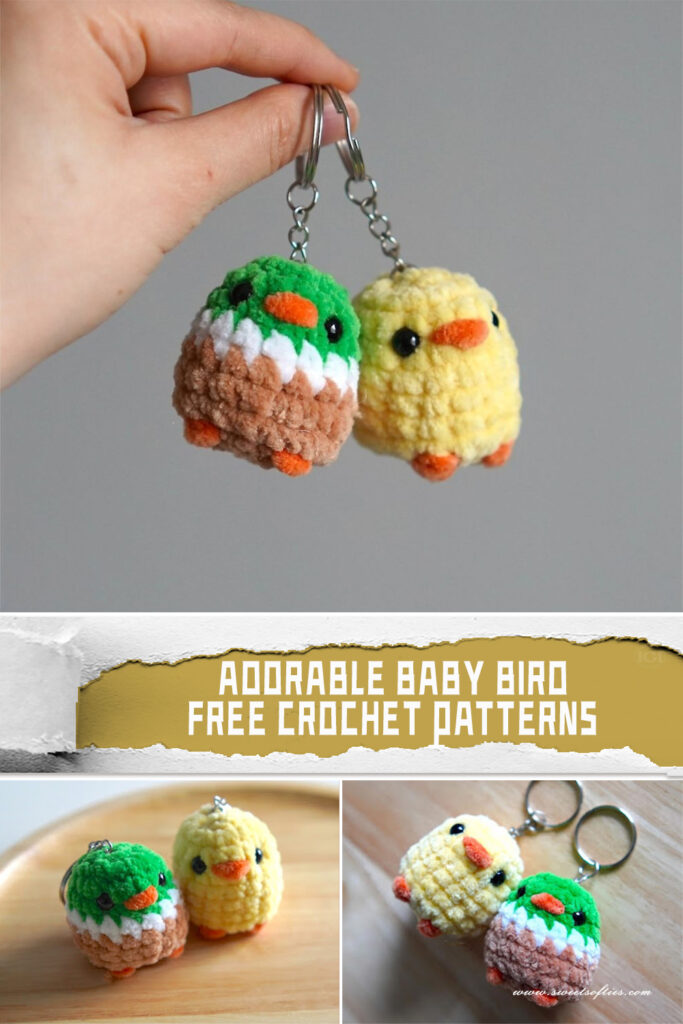
1. The first pattern, from Sweet Softies, offers a quick and easy way to crochet a tiny baby bird in just 10 minutes. With its simple instructions and minimal materials required, this pattern is perfect for beginners and seasoned crocheters alike. The end result is a charming little bird that can be used as a keychain, decoration, or even a heartfelt gift for a loved one.
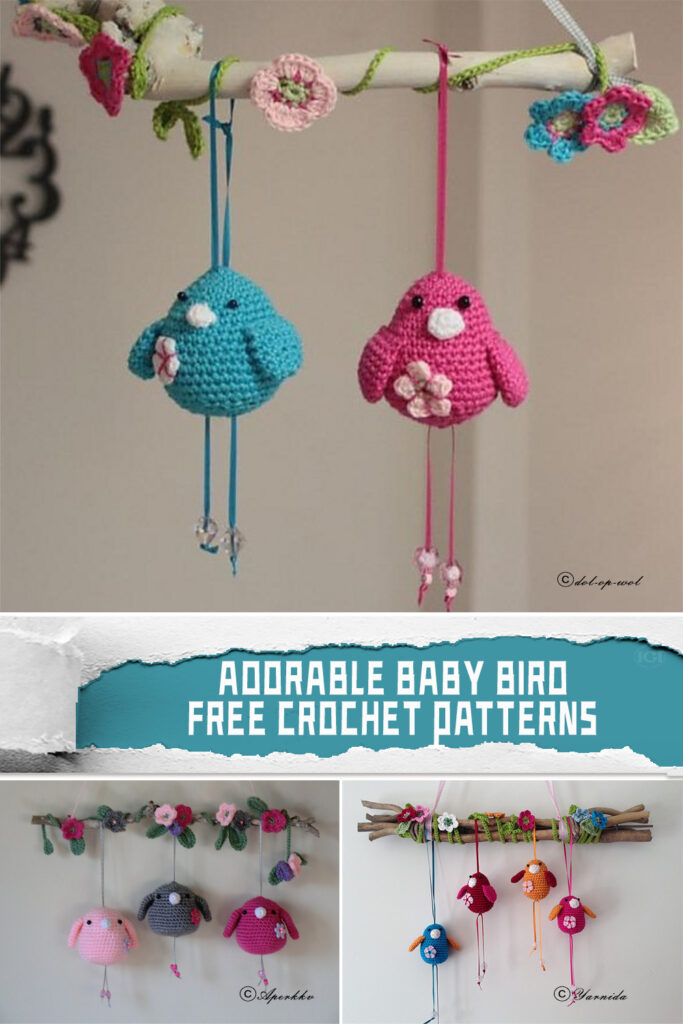
2. The second pattern, found on Dolopwol, takes a slightly different approach by creating a scene of birds perched on a branch. This pattern allows crafters to showcase their creativity by crocheting multiple birds in various colors and sizes, adding a whimsical touch to any space. Whether hung as a mobile in a nursery or displayed as a decorative piece in a living room, these crocheted birds bring joy and warmth wherever they go.
What makes these patterns truly special is the opportunity they provide for personalization. Crafters can experiment with different yarn colors, embellishments, and stitches to make each bird unique. Additionally, the process of crocheting itself offers a therapeutic outlet for stress relief and creative expression, making it not just a hobby, but a form of self-care.
In conclusion, the allure of crocheted baby bird patterns lies not only in their undeniable cuteness but also in the joy they bring to both the crafter and those who behold them. As we navigate the complexities of modern life, taking time to engage in simple yet meaningful activities like crocheting can be a source of comfort and connection. So why not pick up your crochet hook, choose a pattern, and let your imagination take flight?
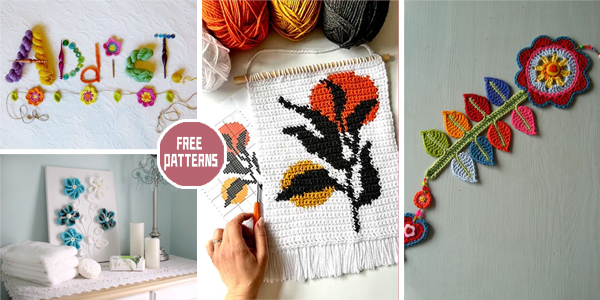
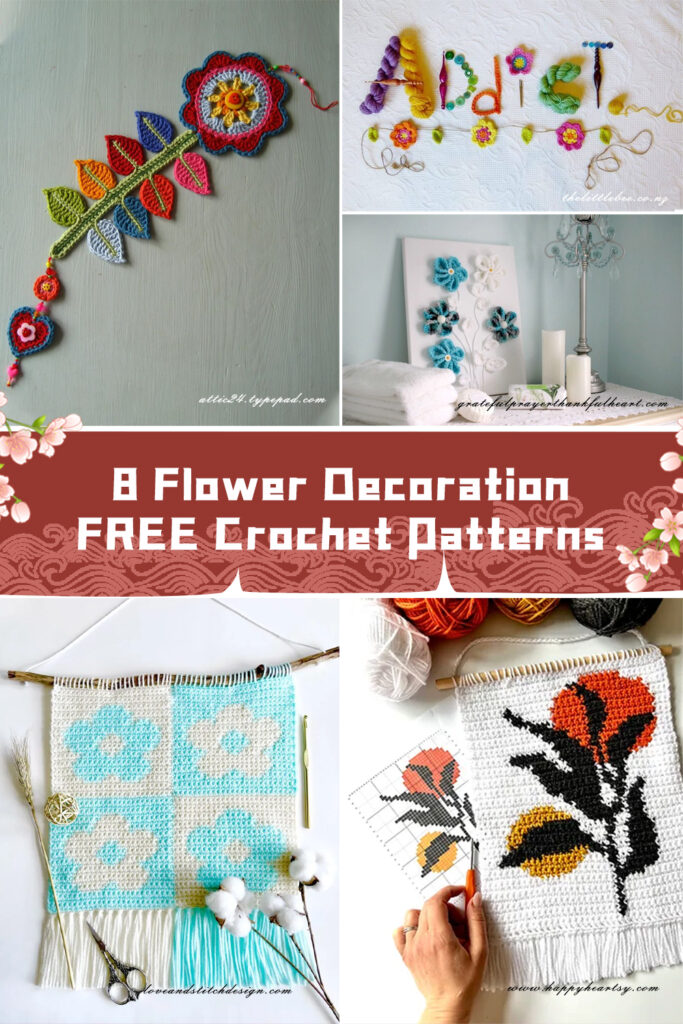
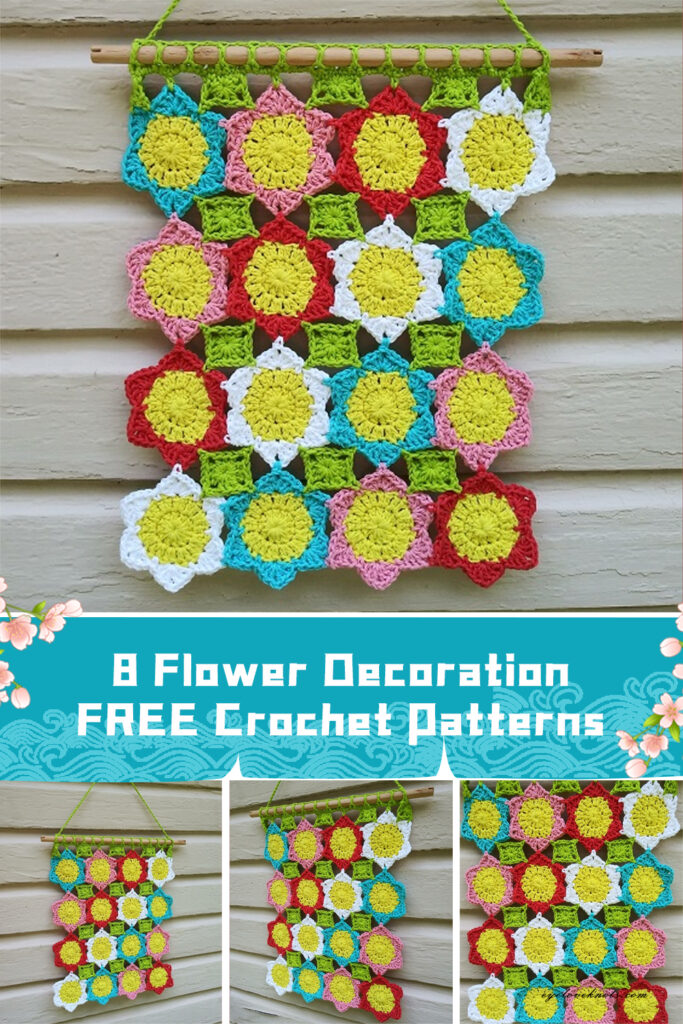
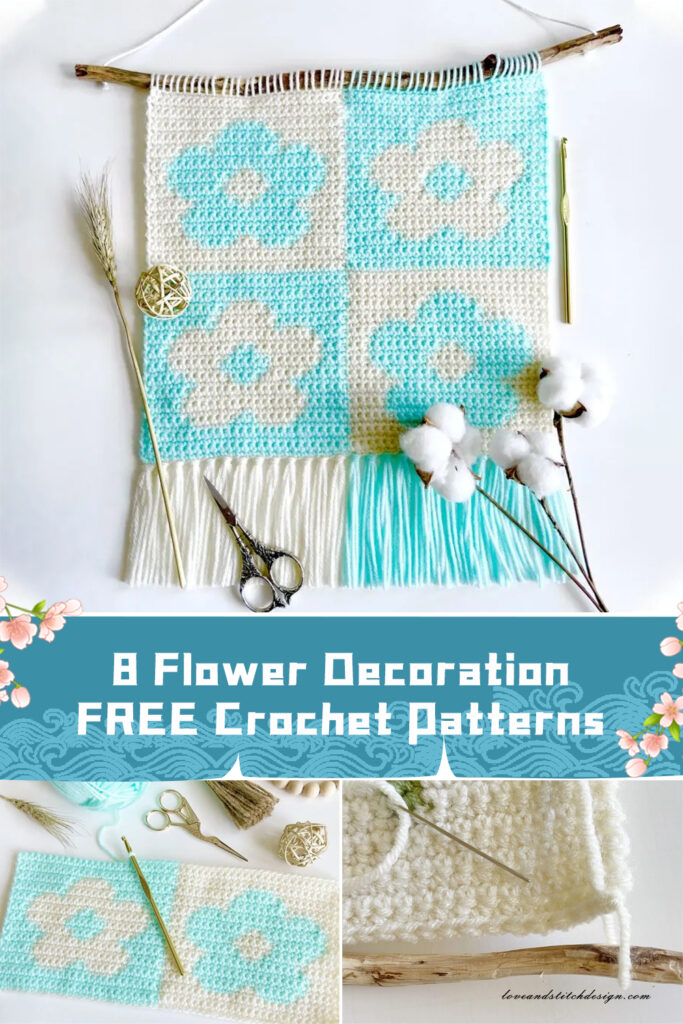
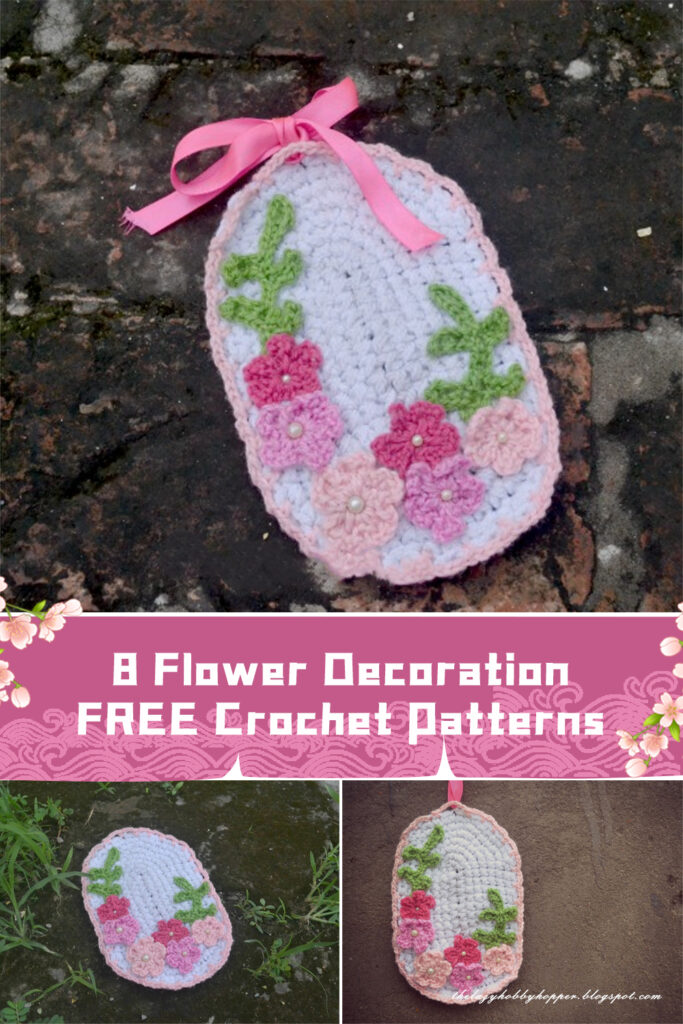
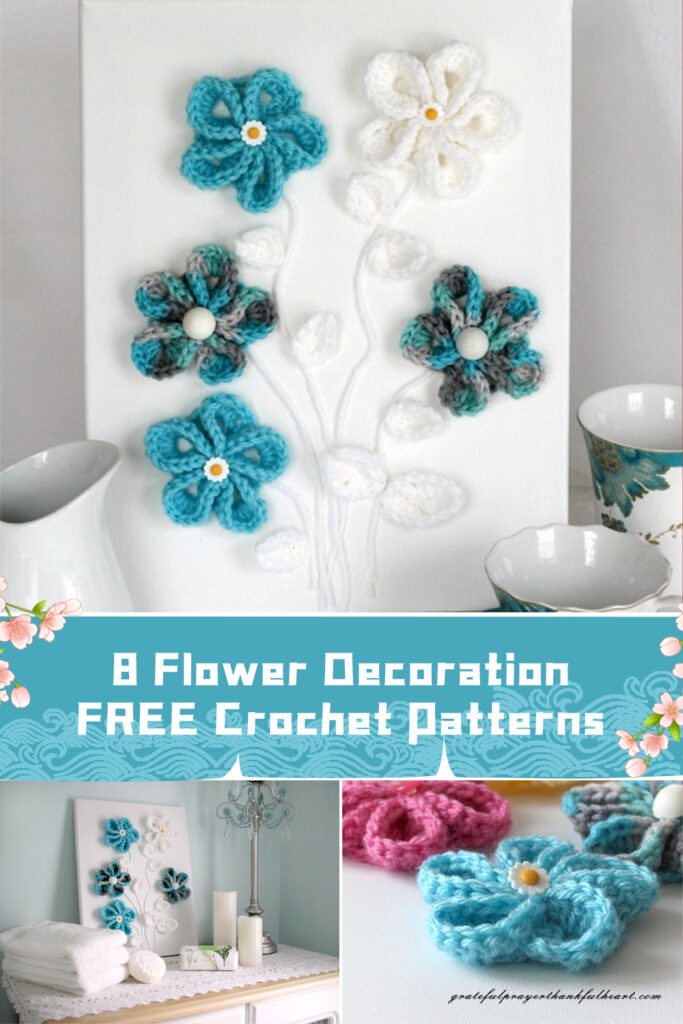
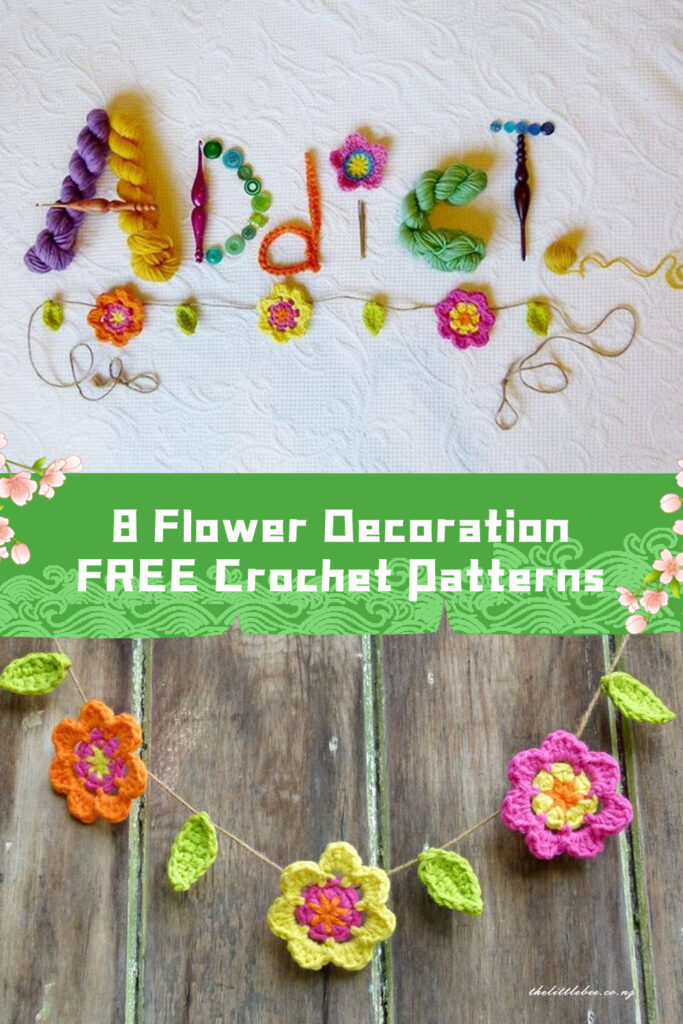
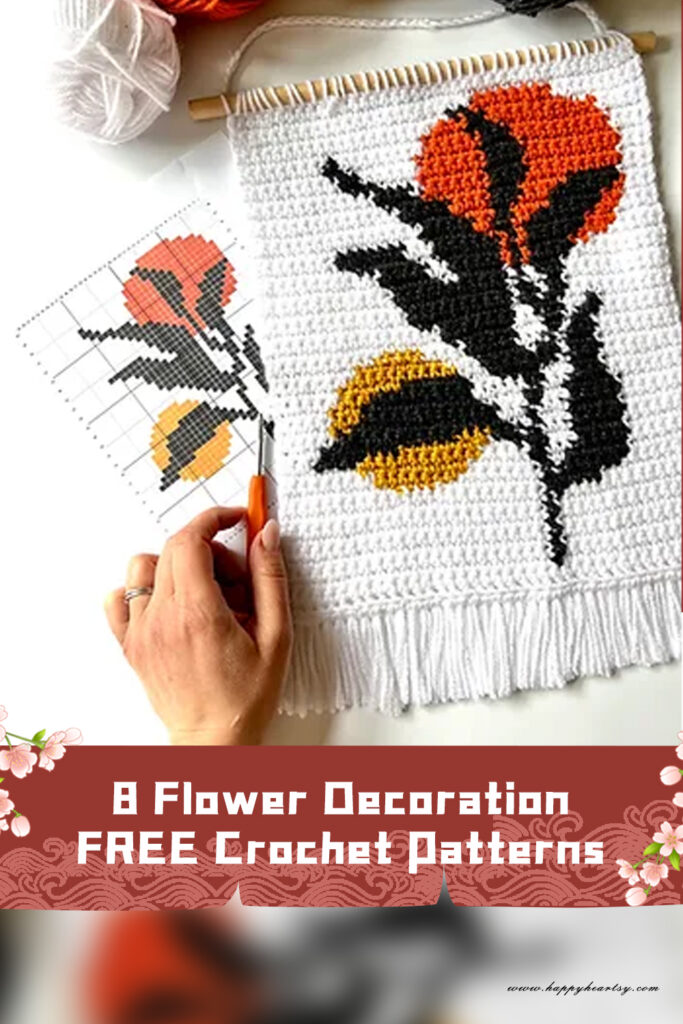
The world of crochet offers a treasure trove of inspiration for flower decorations.In this essay, we will delve into eight delightful flower decoration crochet patterns available for free online. These patterns not only showcase the creativity and skill of crocheters but also provide endless inspiration for those seeking to add a floral flair to their surroundings. From simple and whimsical designs to intricate and elegant motifs, these patterns showcase the creativity, skill, and diversity of the crochet community. Whether you’re a novice crocheter looking to hone your skills or an experienced enthusiast seeking new projects, these free crochet patterns provide endless opportunities for creative expression and personalization. So pick up your crochet hook, unleash your imagination, and let these flower decorations bloom in your hands. Special thanks to all the designers who generously shared these free Flower Decoration Crochet patterns! To access them, just scroll down the page and click on the link below the corresponding image. Happy crafting!
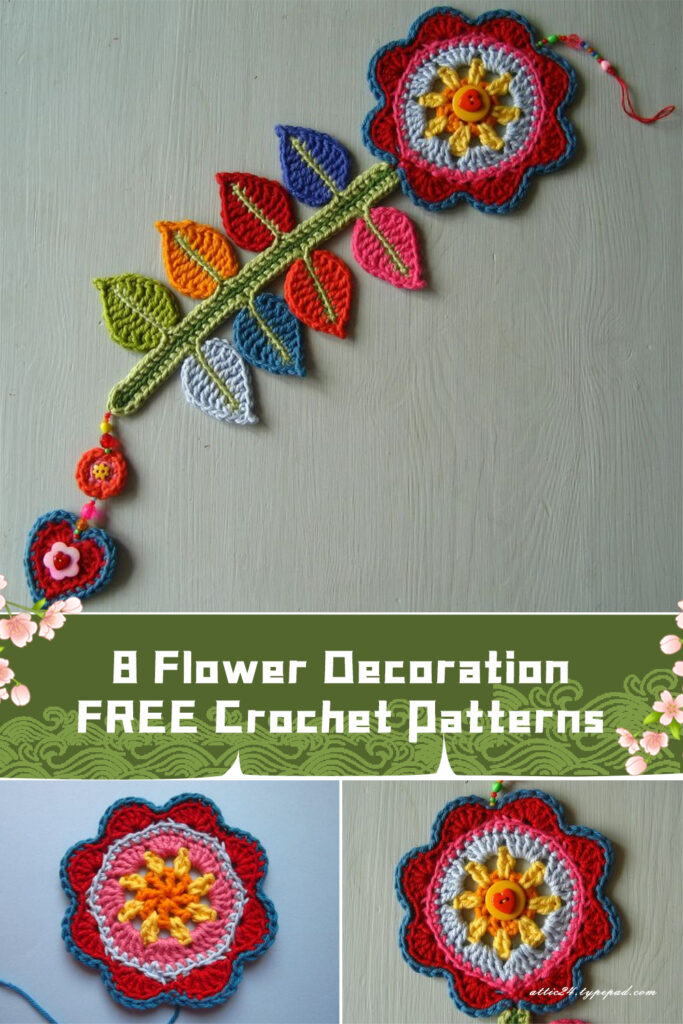
1. Attic24, a well-known crochet blog, presents a cheerful and vibrant flower decoration pattern. With its simple yet effective design, this pattern is perfect for beginners and seasoned crocheters alike. The use of bright colors and basic stitches creates a delightful flower that can be used as a standalone decoration or incorporated into larger projects such as garlands or wreaths. The versatility of this pattern makes it a favorite among crochet enthusiasts looking to add a pop of color to their homes.
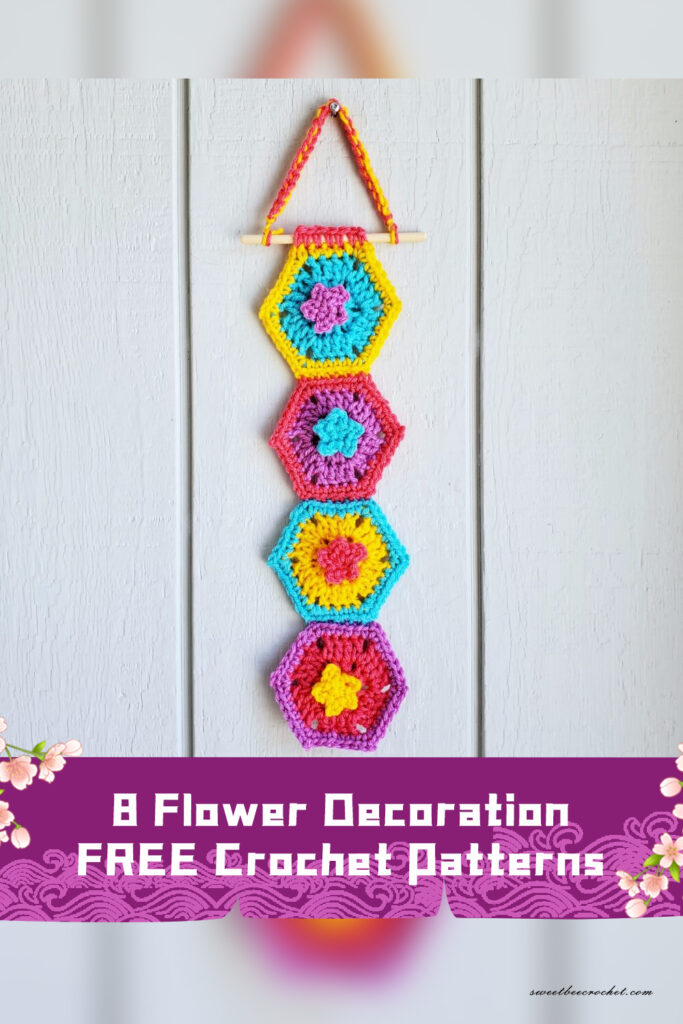
2. Sweet Bee Crochet offers a unique twist on traditional flower decorations with their hexie flower wall hanging pattern. By combining hexagonal motifs with floral elements, this pattern creates a striking visual effect that is both modern and whimsical. The use of different colors and textures adds depth and dimension to the design, making it a captivating addition to any wall or space. With clear instructions and detailed photos, this pattern is accessible to crocheters of all skill levels, encouraging creativity and experimentation.
3. EyeLoveKnots presents Lily’s Floral Wall Hanging, a charming crochet pattern inspired by the beauty of nature. Featuring delicate flowers and leaves arranged in a cascading design, this pattern evokes a sense of serenity and elegance. The intricate details and intricate stitches showcase the skill and artistry of the designer, while the step-by-step instructions make it accessible to crocheters of all levels. Whether hung on a wall or used as a decorative accent, this pattern adds a touch of botanical beauty to any space.
4. Love and Stitch Design offers a retro-inspired flower wall hanging pattern that is sure to delight vintage enthusiasts. With its bold colors and geometric motifs, this pattern captures the essence of retro design while putting a modern twist on the classic flower decoration. The use of textured stitches and strategic placement of flowers create a dynamic and eye-catching piece that is perfect for adding a pop of personality to any room. Whether hung alone or as part of a gallery wall, this pattern is sure to make a statement.
5. The Lazy Hobby Hopper presents a crochet medallion pattern adorned with charming flowers, perfect for adding a touch of whimsy to any project. The circular design and intricate stitches create a visually stunning centerpiece that can be used as a motif, coaster, or decorative element. With its versatility and ease of customization, this pattern offers endless possibilities for creative expression. Whether used individually or combined with other motifs, these crochet flowers are sure to brighten up any space.
6. Grateful Prayer, Thankful Heart offers a delightful springtime crochet pattern featuring a bouquet of flowers in a simple vase. With its bright colors and playful design, this pattern captures the essence of spring and brings a breath of fresh air into any room. The use of basic stitches and clear instructions make it accessible to crocheters of all levels, while the end result is a charming decoration that is sure to lift spirits and inspire joy.
7. The Little Bee presents a whimsical crochet pattern called Biting Bullet, featuring a trio of playful flowers with button centers. With its quirky design and unexpected details, this pattern adds a touch of humor and whimsy to any space. The use of bold colors and textured stitches creates a dynamic and eye-catching piece that is sure to spark conversation. Whether used as a brooch, appliqué, or standalone decoration, these crochet flowers are sure to bring a smile to anyone’s face.
8. Happy Heartsy offers a mesmerizing tapestry crochet pattern featuring a stunning floral motif inspired by the beauty of the moon. With its intricate details and rich textures, this pattern creates a captivating focal point that is sure to impress. The use of multiple colors and strategic placement of stitches adds depth and dimension to the design, while the end result is a breathtaking work of art that is sure to be cherished for years to come.
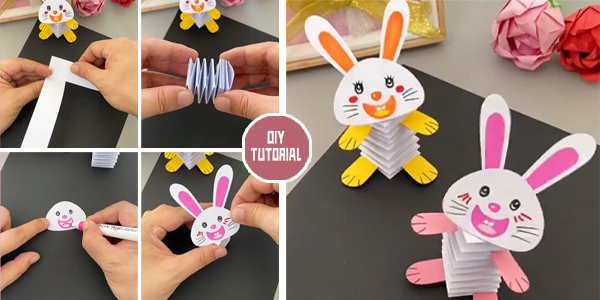
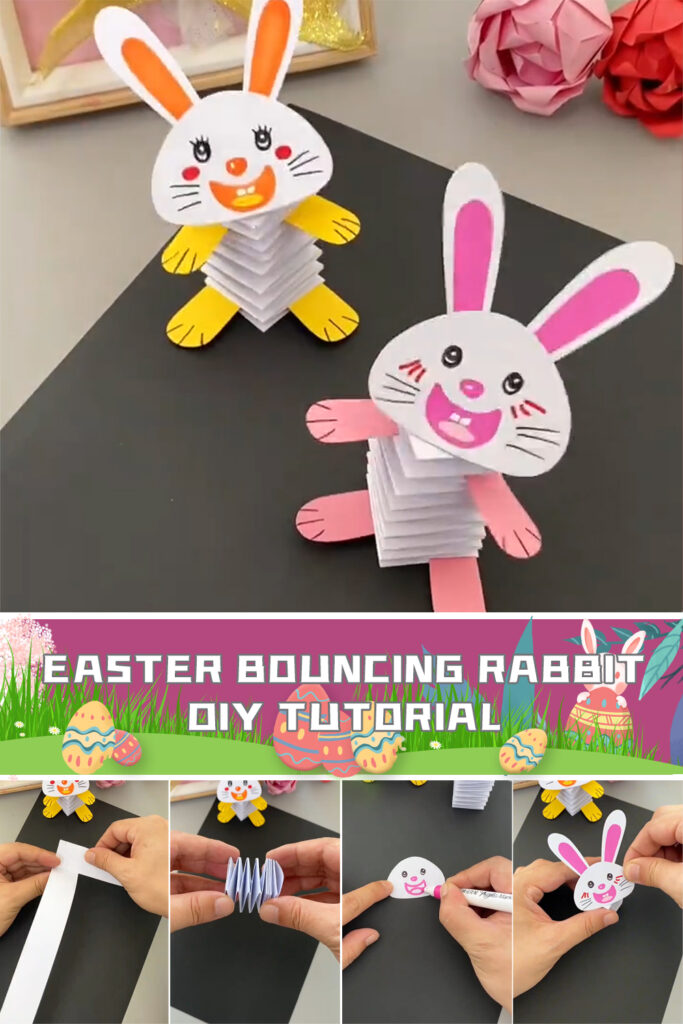
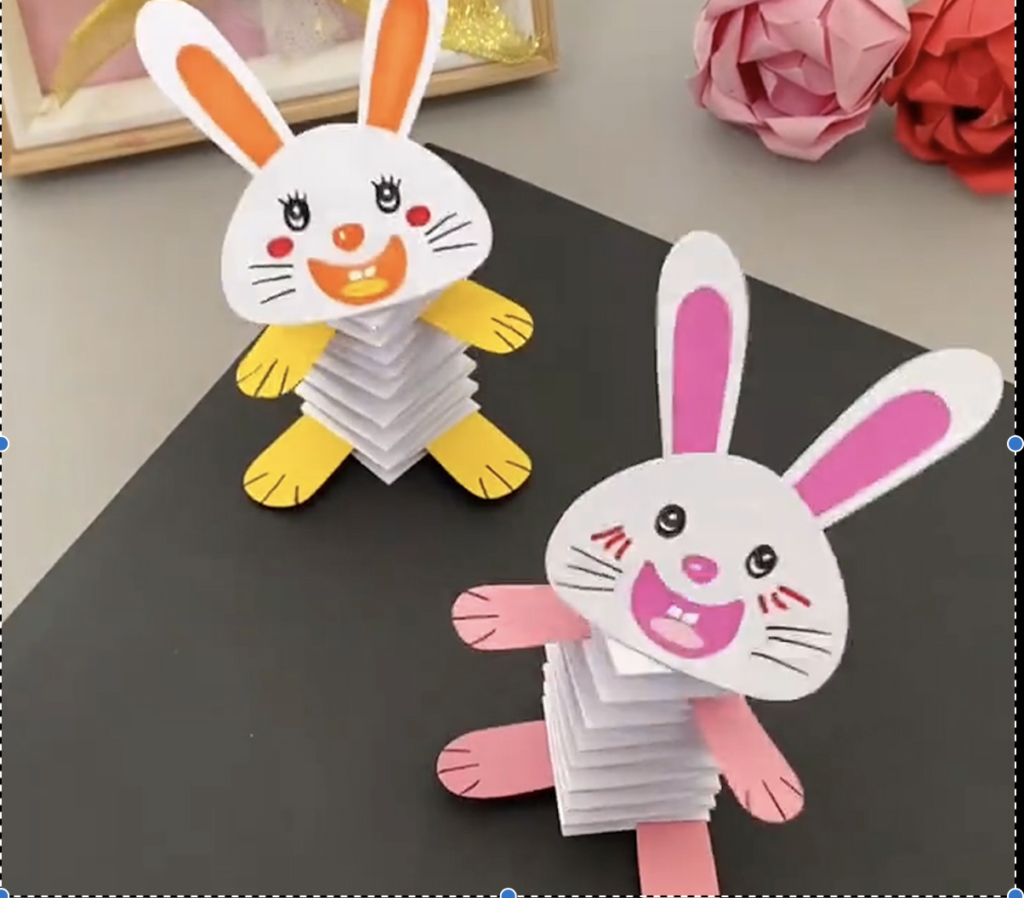
With the arrival of Easter, it’s the perfect time to indulge in some creative crafting to usher in the spirit of spring. If you’re looking for a fun and easy project to add a touch of whimsy to your Easter decorations, look no further than this DIY Easter Bouncing Rabbit tutorial. With just a few simple materials and easy-to-follow steps, you can create adorable bouncing rabbits that are sure to bring joy to your home.
To get started, gather the following materials: white paper, scissors, colored markers, and glue.
Step by step tutorial for DIY Easter Bouncing Rabbit:
1. Begin by taking two rectangular pieces of white paper and folding them together. These folded papers will serve as the base for your bouncing rabbit.
2. Next, start twisting the folded paper strips continuously to form a spring-like shape. This will be the body of your bouncing rabbit, providing it with the playful bounce that gives it its charm.
3. Now, take another piece of white paper and cut it into a slightly oval shape to create the rabbit’s face. Use colored markers to draw on the rabbit’s eyes, nose, mouth, and any other facial features you desire.
4. Using scissors, carefully cut out two ear shapes from the white paper. These will serve as the rabbit’s ears, adding an extra element of cuteness to your creation.
5. Once you have all the components ready, it’s time to assemble your bouncing rabbit. Use glue to attach the rabbit’s face to the spring-shaped body, making sure to align it properly for a charming look. Then, glue the ears onto the top of the rabbit’s face, securing them in place.
And there you have it – your DIY Easter Bouncing Rabbit is complete! Place it on your mantel, dining table, or any other surface where it can bring a smile to everyone’s face. You can make multiple rabbits in different sizes and colors to create a delightful Easter display that will brighten up any room.
In conclusion, this DIY Easter Bouncing Rabbit tutorial offers a fun and creative way to celebrate the season and add a touch of whimsy to your Easter decor. With just a few simple materials and easy steps, you can craft adorable bouncing rabbits that will delight both young and old alike. So gather your supplies and get ready to hop into some Easter crafting fun!
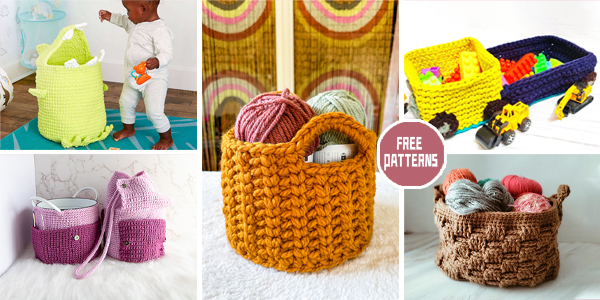
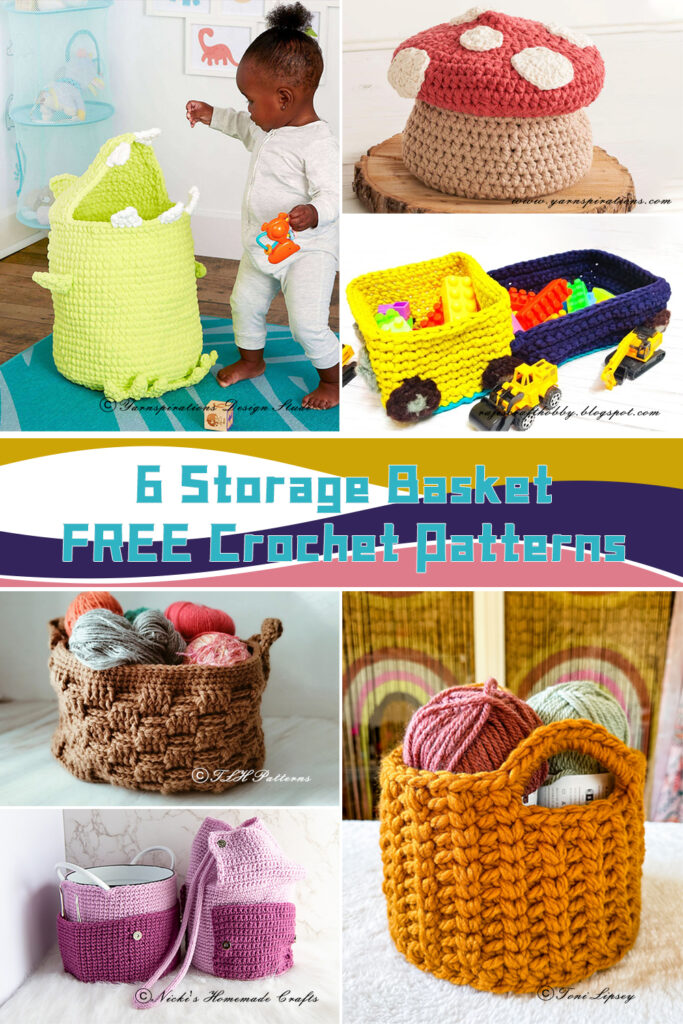
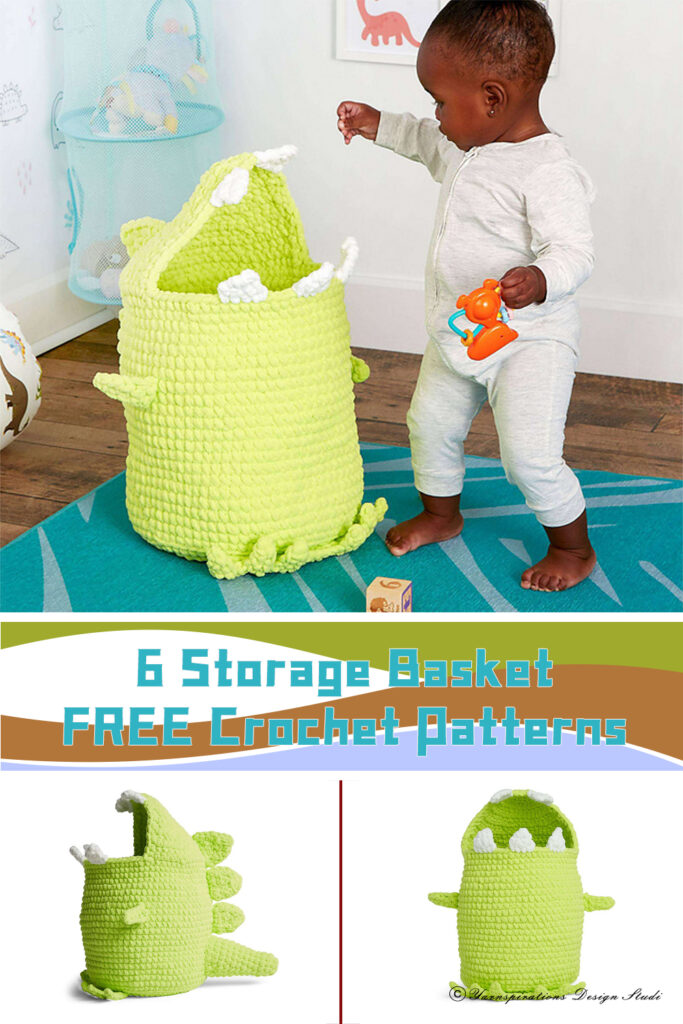
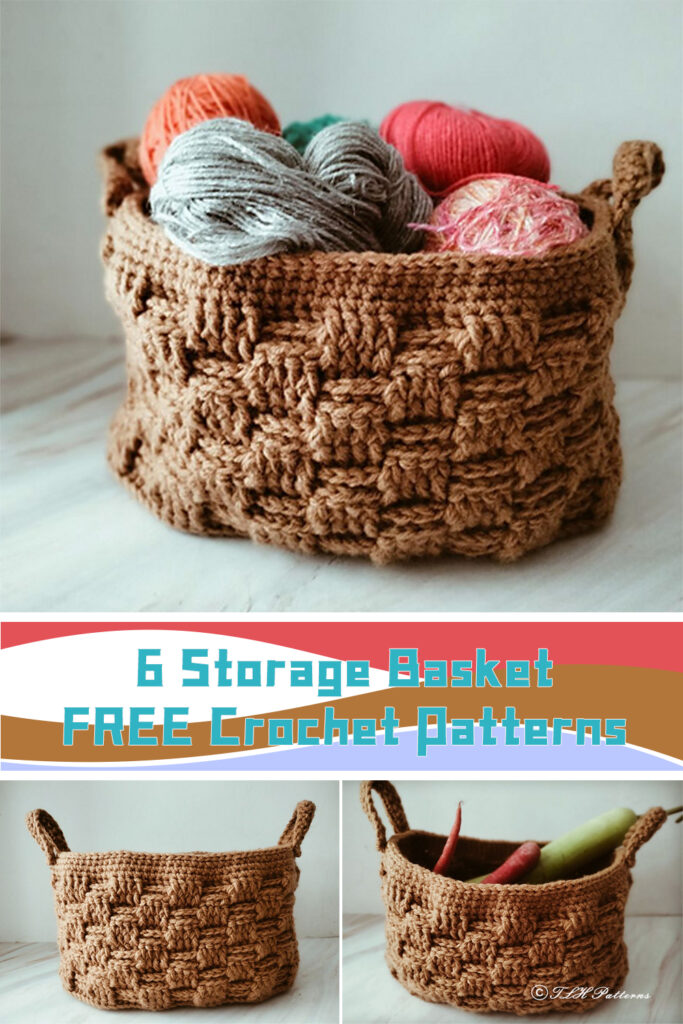
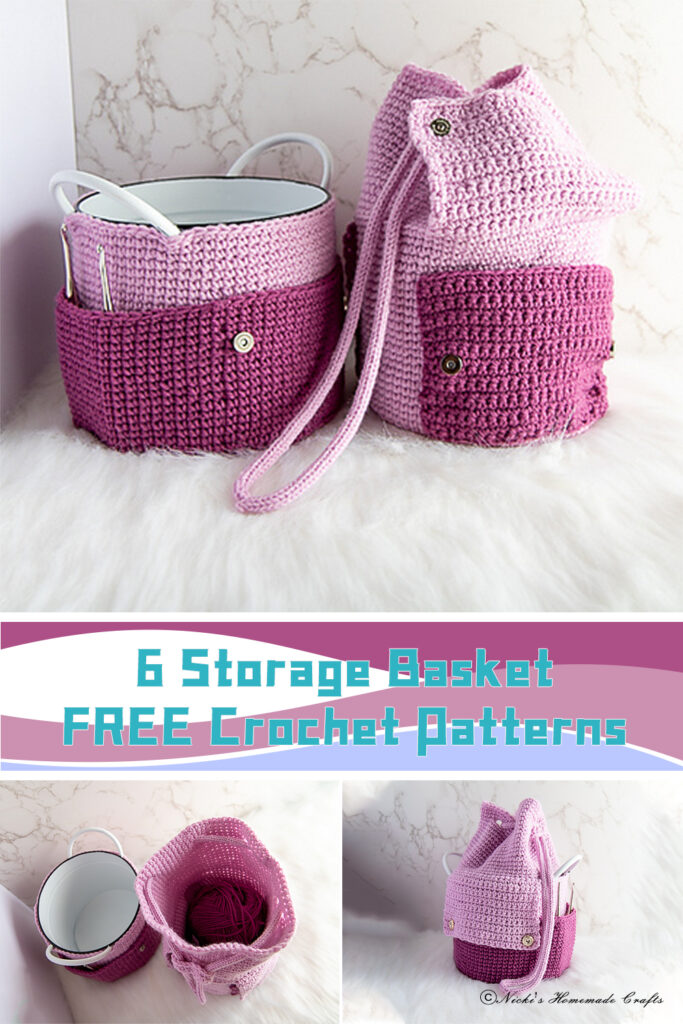
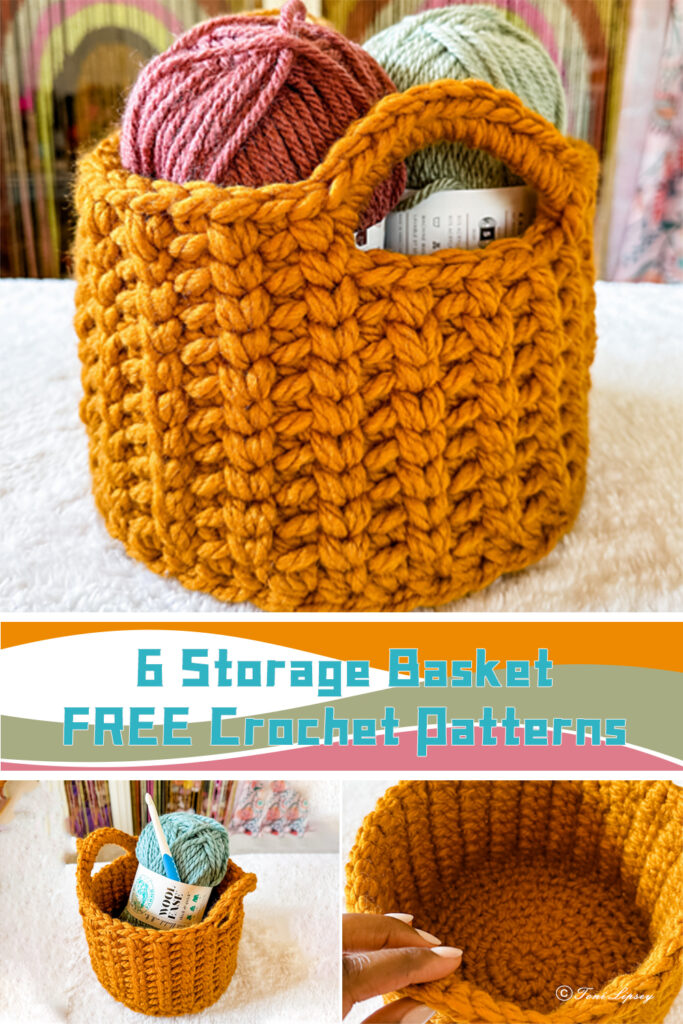
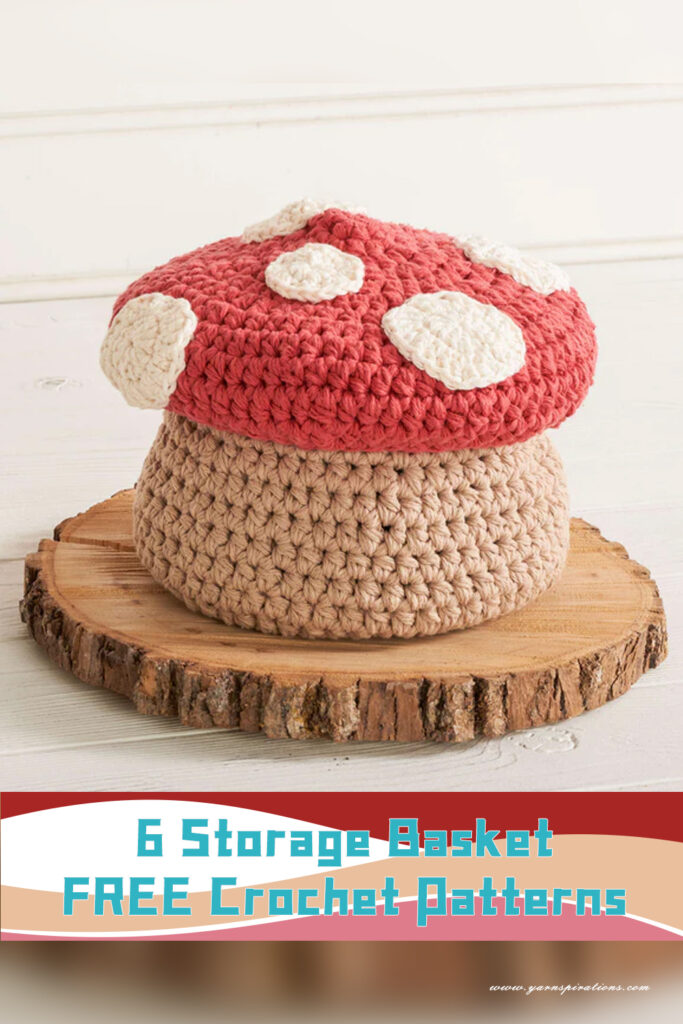
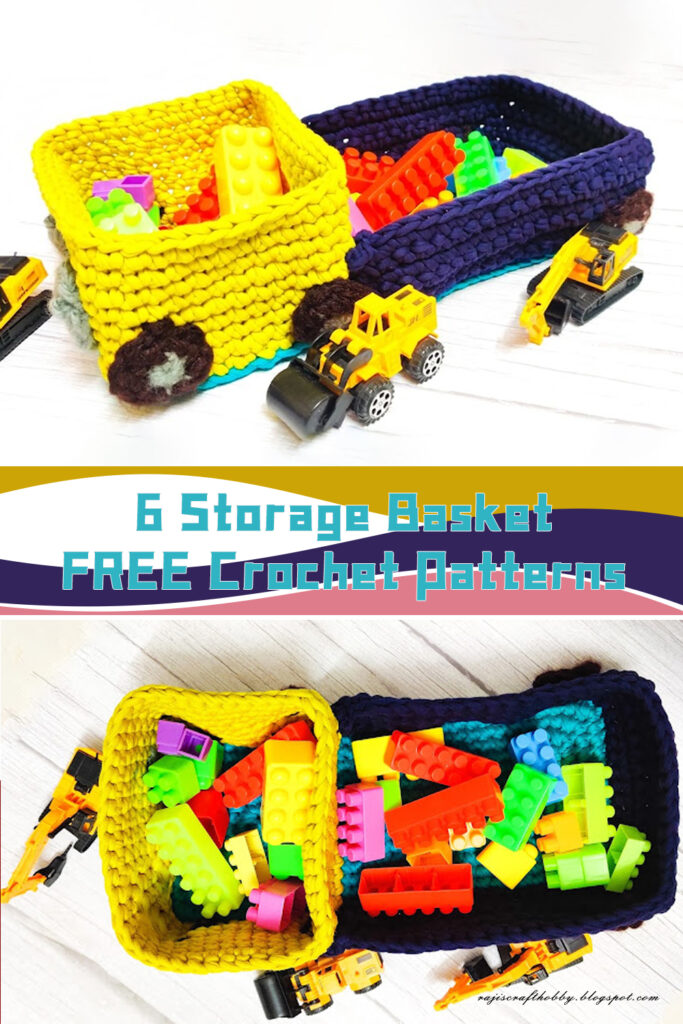
Storage baskets stand out as both practical and aesthetically pleasing additions to any home. In this essay, we delve into six free crochet patterns for storage baskets, each offering its unique charm and functionality. These six patterns showcase the versatility, creativity, and craftsmanship inherent in crocheting. From whimsical designs to practical solutions, each pattern offers crocheters an opportunity to express their creativity while adding functional beauty to their homes. Whether you’re a seasoned crafter or a novice enthusiast, these patterns invite you to embark on a rewarding journey of crafting and creativity. Special thanks to all the designers who generously shared these free Storage Basket Crochet patterns! To access them, just scroll down the page and click on the link below the corresponding image. Happy crafting!
1. Bernat Crochet Dinosaur Toy Storage Basket: The first pattern takes us on a whimsical journey with a dinosaur-themed storage basket from Yarnspirations. Designed to resemble a cute dinosaur, this basket adds a playful touch to any child’s room while providing ample storage space for toys or other belongings. The textured stitches and carefully crafted details make this basket not only functional but also a delightful decorative piece.
2. Crochet Storage Basket Using Basket Weave Stitch: Next, we encounter a versatile pattern from The Lazy Hobby Hopper blog. Utilizing the basket weave stitch, this pattern creates a sturdy and visually appealing storage basket suitable for various purposes. The basket weave stitch adds depth and texture, giving the finished product a rustic yet modern look. Whether used for storing yarn, towels, or household essentials, this basket is sure to complement any decor style.
3. Crochet Yarn Storage Bucket Pattern: Moving on, we explore a practical yet stylish yarn storage solution from Nicki’s Homemade Crafts. This pattern features a cylindrical bucket design adorned with a simple yet elegant ribbed texture. Perfect for organizing skeins of yarn or other craft supplies, this storage bucket adds a touch of sophistication to any crafting space. The pattern offers flexibility in size, allowing crocheters to customize the dimensions according to their needs.
4. Beginner Chunky Round Crochet Basket Pattern: The fourth pattern, courtesy of TL Yarn Crafts, caters to beginners looking to embark on their crochet journey. With its straightforward instructions and basic stitches, this chunky round basket is an ideal project for those new to crocheting. Despite its simplicity, the finished basket exudes charm and character, thanks to its chunky yarn and minimalist design. Whether used for storing blankets, pillows, or household items, this basket adds a cozy touch to any living space.
5. Lily Sugar’n Cream Crochet Lidded Toadstool Basket: Our fifth pattern introduces a whimsical lidded basket inspired by a charming toadstool design, also from Yarnspirations. This unique basket combines functionality with enchanting aesthetics, making it a delightful addition to any room. The toadstool lid adds a touch of whimsy, while the sturdy construction ensures secure storage for various items. Whether used as a decorative accent or a practical storage solution, this basket is sure to spark joy in any space.
6. Toy Truck Crochet Storage Basket with Wheels: Lastly, we encounter a playful storage basket shaped like a toy truck, courtesy of Raji’s Craft Hobby blog. This imaginative design transforms a simple storage basket into a fun and functional toy for children. Complete with wheels and intricate details, this crochet truck basket offers a whimsical way to tidy up toys and clutter.
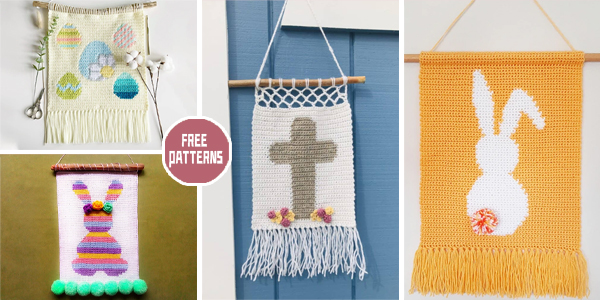
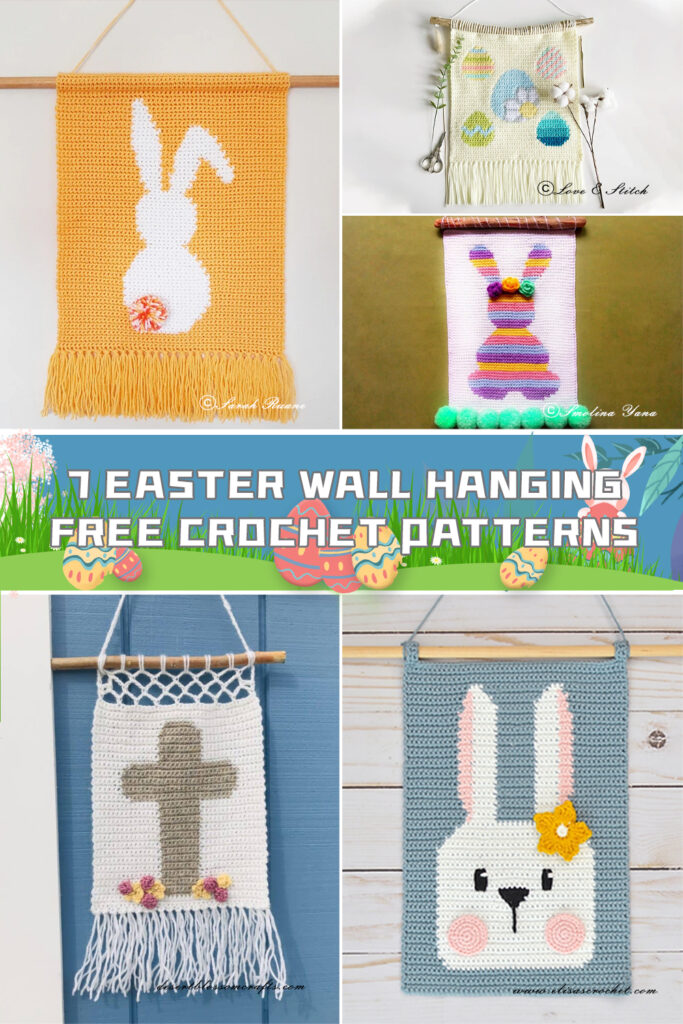
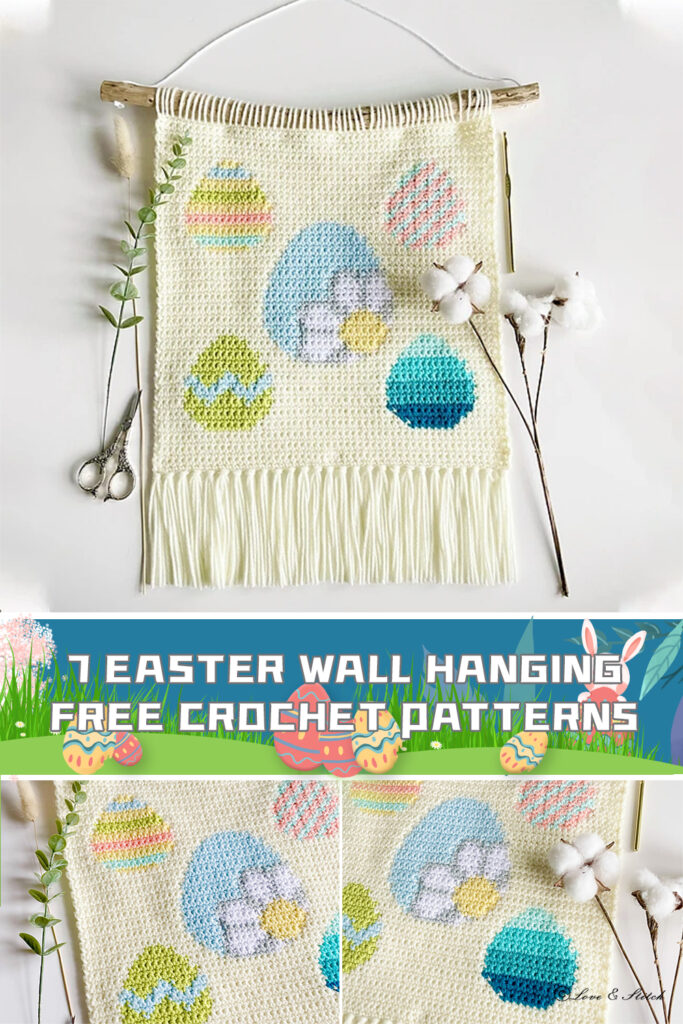
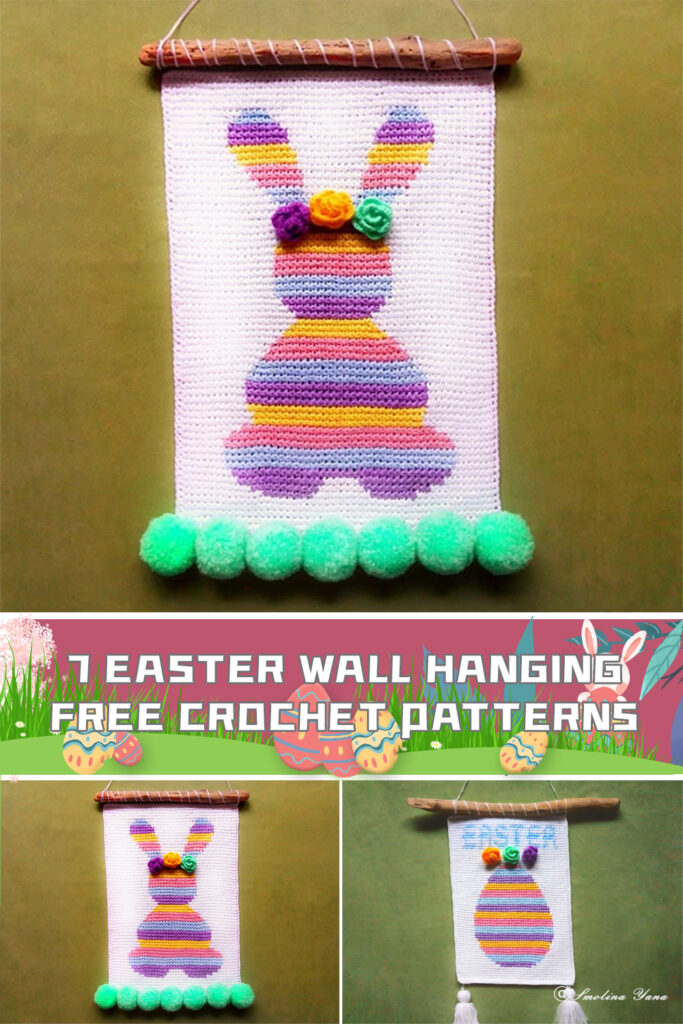
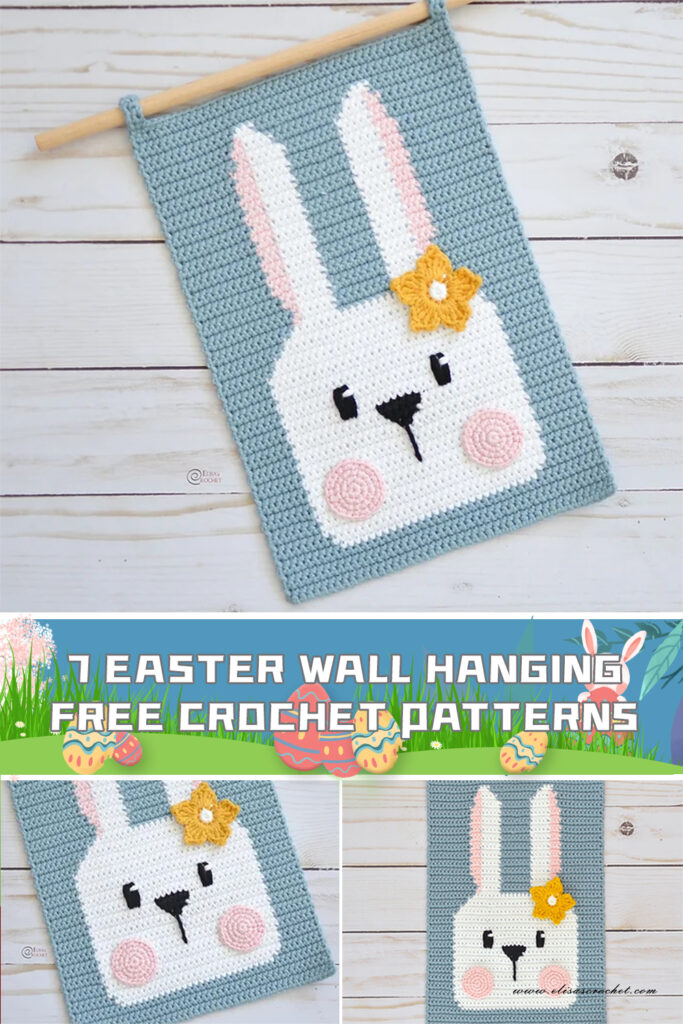
Crochet wall hangings offer a creative and festive way to celebrate Easter and usher in the joys of spring. In this essay, we’ll explore seven free crochet patterns that capture the essence of Easter.From playful bunnies to elegant crosses, these seven free patterns provide a wealth of inspiration for crocheters of all levels. Whether you’re looking for a quick project to brighten up your home or a meaningful decoration to mark the season, these patterns offer something for everyone. So pick up your crochet hook, gather your favorite yarn, and let your creativity soar as you bring a touch of Easter magic into your home with these delightful wall hangings. Special thanks to all the designers who generously shared these free Easter Wall Hanging Crochet patterns! To access them, just scroll down the page and click on the link below the corresponding image. Happy crafting!
1. The Easter Egg Hunt Wall Hanging pattern from Love and Stitch Design is a delightful creation that brings the excitement of the Easter egg hunt indoors. With colorful eggs and a playful bunny motif, this pattern embodies the spirit of Easter joyfully. The pattern’s detailed instructions make it accessible for crocheters of all skill levels, allowing anyone to create a charming piece of decor for their home.
2. Smolina Yana’s charming Easter Bunny and Egg Decor pattern combines traditional Easter symbols with a modern twist. The intricate details of the bunny and eggs make this wall hanging a true work of art. Crocheters can personalize their creations by choosing their favorite colors, adding embellishments, or experimenting with different yarn textures. This pattern provides a wonderful opportunity for creativity and expression.
3. Ned and Mimi’s Bunny Wall Hanging pattern is sweet and whimsical, perfect for adding a touch of Easter charm to any room. The adorable bunny motif is sure to bring a smile to everyone who sees it. This pattern is ideal for crocheters looking for a quick and easy project that yields beautiful results. Whether hung on a wall or displayed as part of a seasonal vignette, this bunny wall hanging is sure to become a cherished Easter decoration.
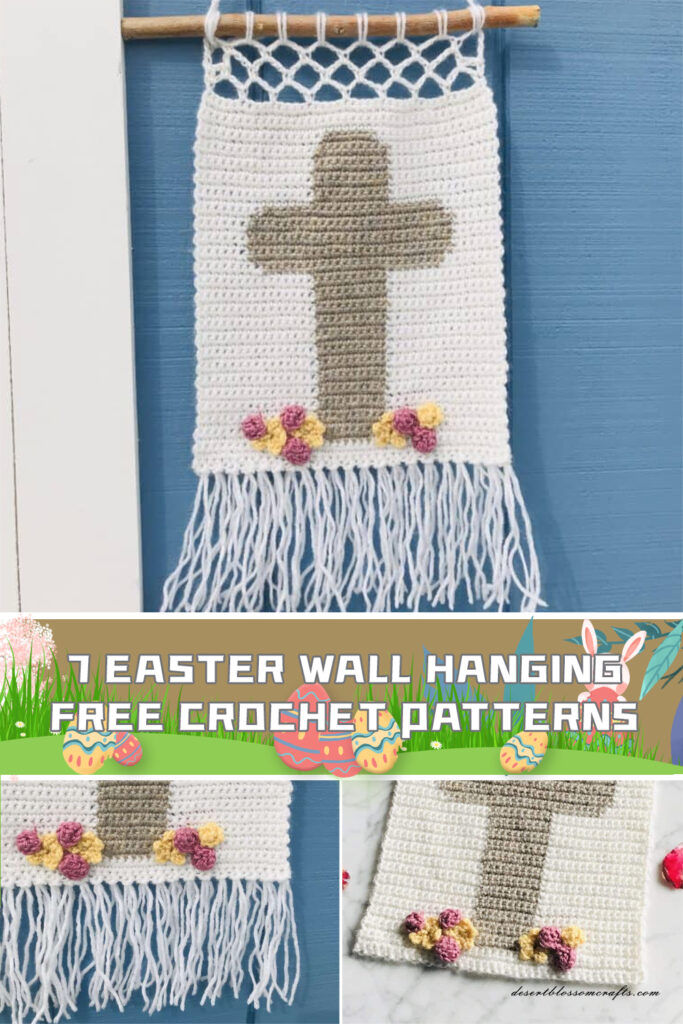
4. For those seeking a more traditional Easter symbol, Desert Blossom Crafts offers a Crochet Easter Cross Wall Hanging pattern. This elegant design features a simple yet striking cross motif, accented with delicate flowers. The pattern’s thoughtful details and timeless beauty make it a meaningful addition to any Easter decor collection. Crocheters can customize their creations by choosing yarn colors that resonate with their personal style and aesthetic.
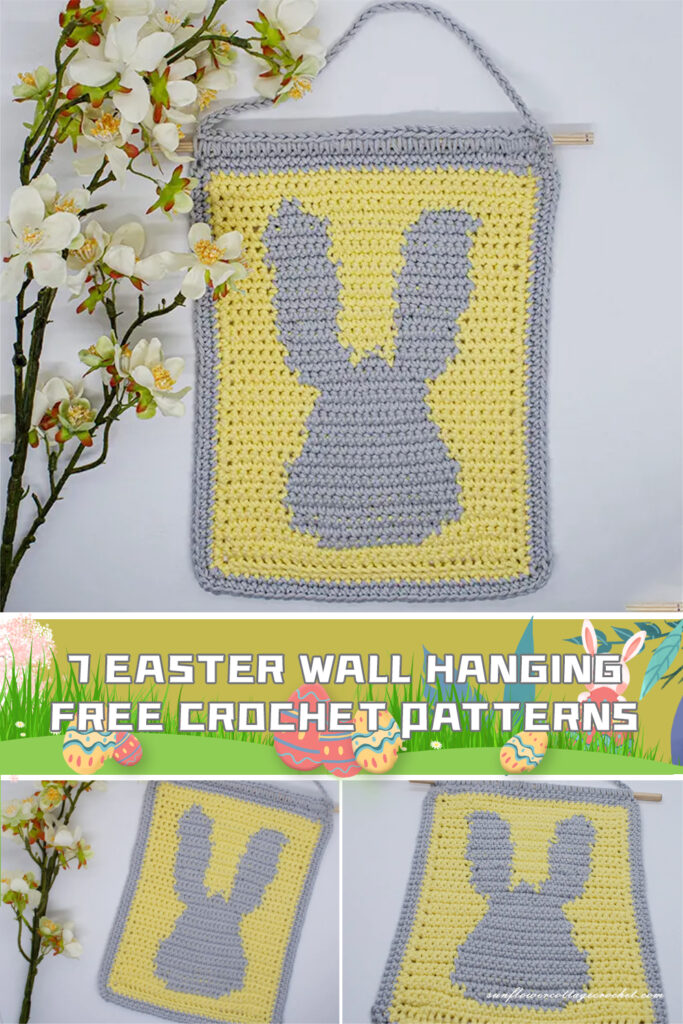
5. Sunflower Cottage Crochet’s Cute Bunny Wall Hanging pattern is as charming as it is adorable. With its lovable bunny face and floppy ears, this wall hanging is sure to capture hearts. The pattern’s clear instructions and helpful tips make it suitable for crocheters of all levels. Whether made as a gift for a loved one or as a special treat for oneself, this bunny wall hanging is sure to spread Easter joy wherever it’s displayed.
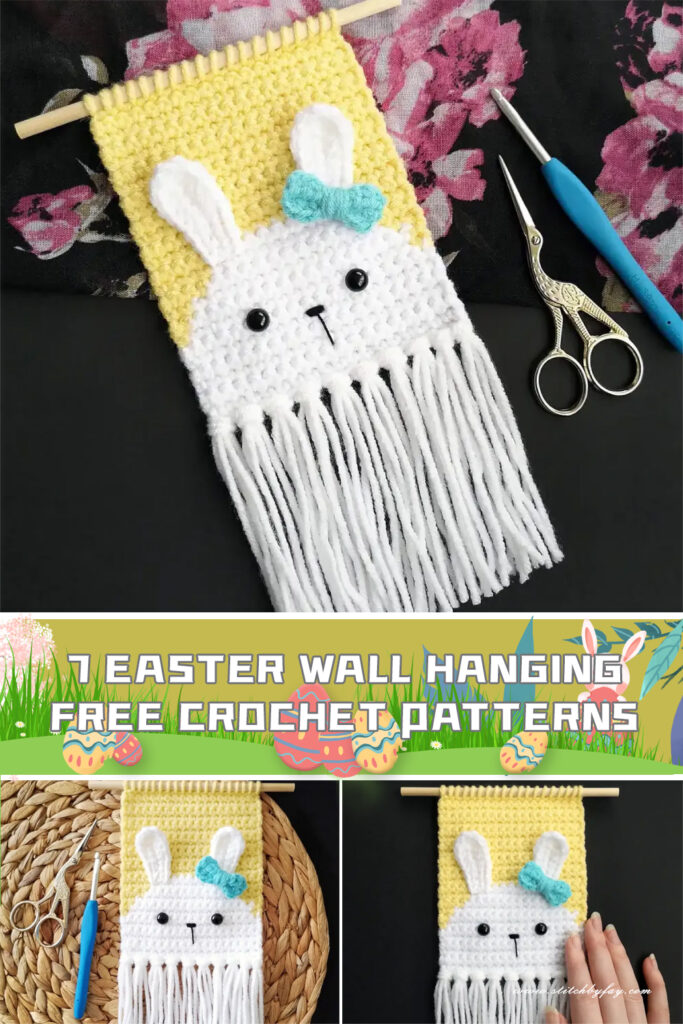
6. Stitch by Fay’s Mini Bunny Wall Hanging pattern offers a delightful twist on the traditional Easter bunny motif. With its petite size and whimsical design, this wall hanging is perfect for adding a touch of Easter whimsy to small spaces. The pattern’s concise instructions and step-by-step photos make it a breeze to crochet, making it an ideal project for beginners or for crocheters looking for a quick and satisfying make.
7. Elisa’s Crochet’s Spring Wall Hanging pattern captures the essence of the season with its cheerful colors and playful design. Featuring flowers, butterflies, and a bright sun, this wall hanging is a celebration of all things spring. Crocheters can customize their creations by choosing yarn colors that reflect the beauty of the season in their own surroundings. Whether hung in a sunny kitchen or a cozy living room, this wall hanging is sure to bring a smile to everyone who sees it.
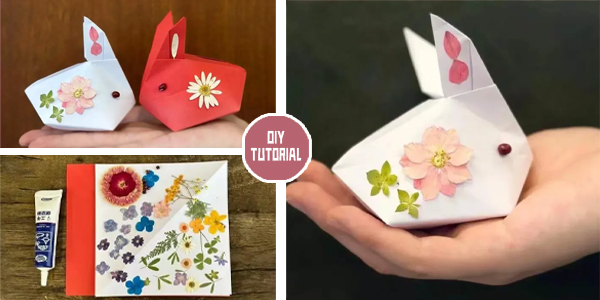
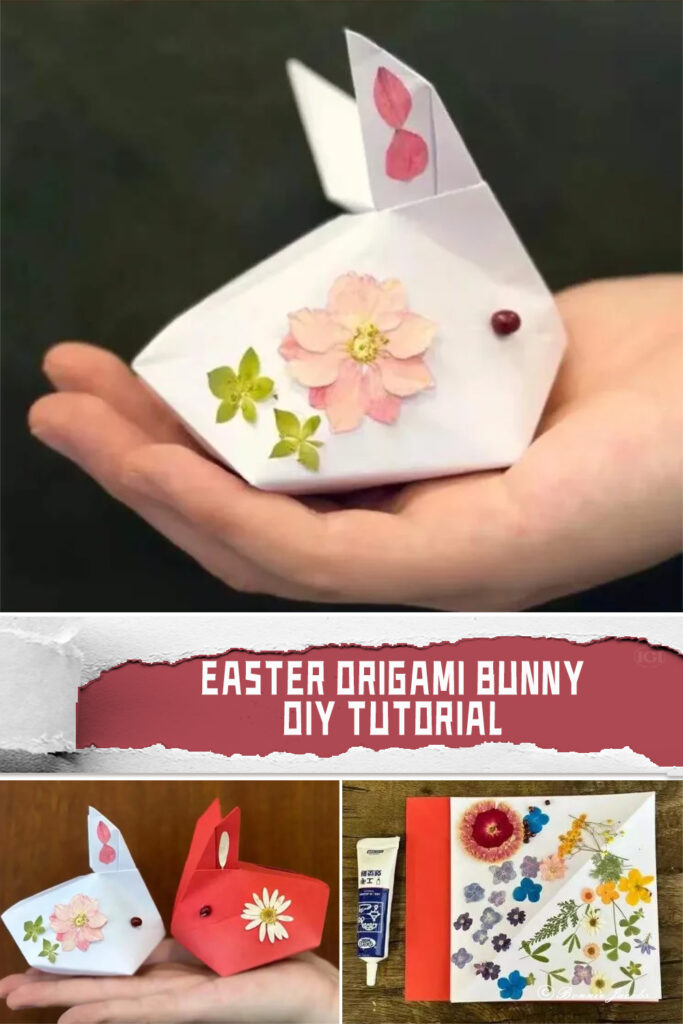
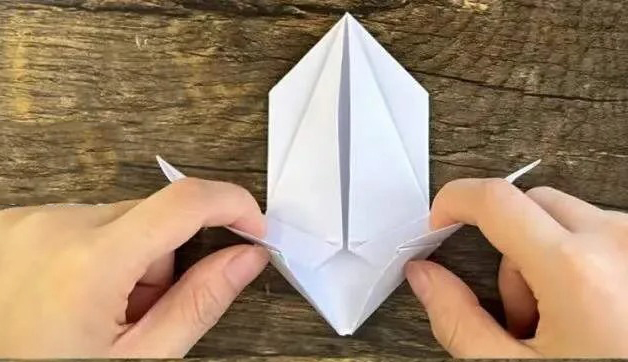
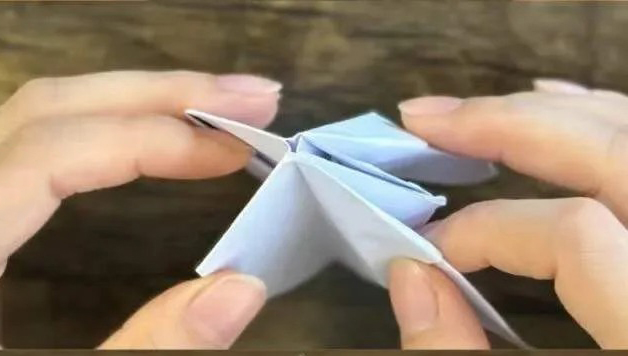
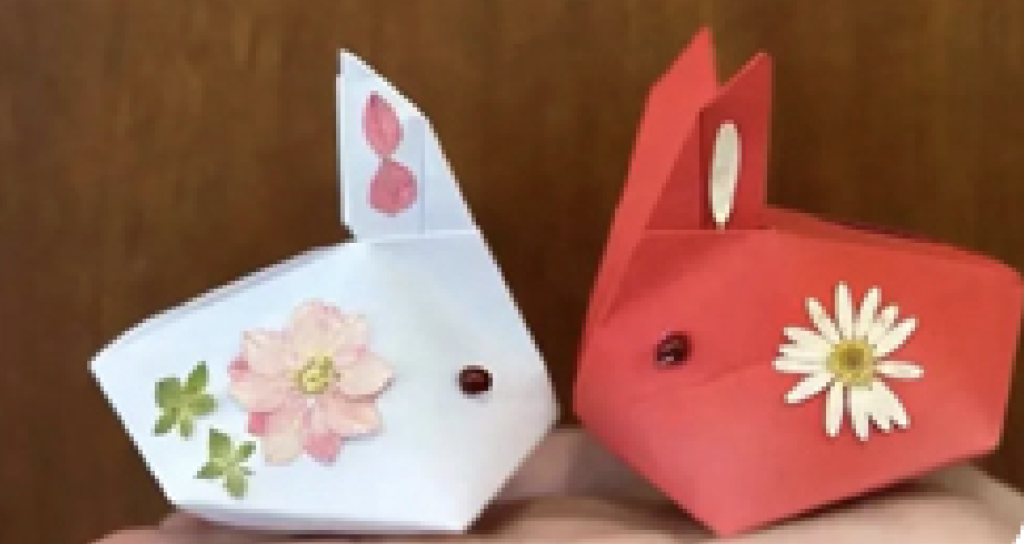
Origami, the ancient Japanese art of paper folding, offers endless possibilities for creating beautiful and intricate designs with just a simple piece of paper. In this tutorial, we will explore how to make an adorable DIY Easter Origami Bunny , perfect for Easter decorations or as a delightful handmade gift. With just a few folds and a touch of creativity, you can bring this charming bunny to life.
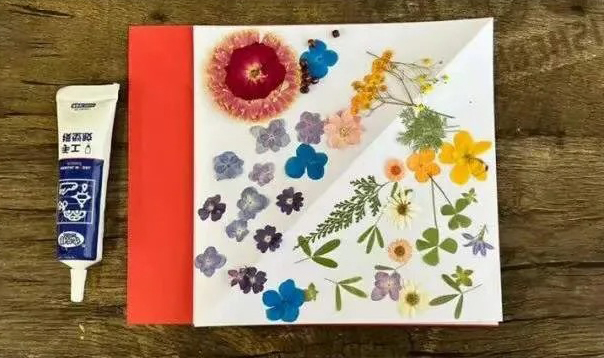
To begin, gather the necessary tools: square paper, dried flowers (optional for decoration), and glue.
Step by step tutorial for DIY Easter Origami Bunny:
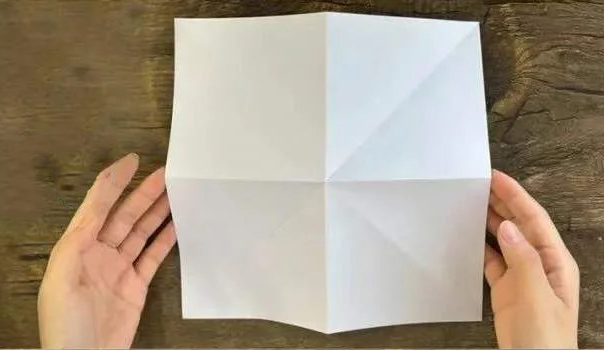
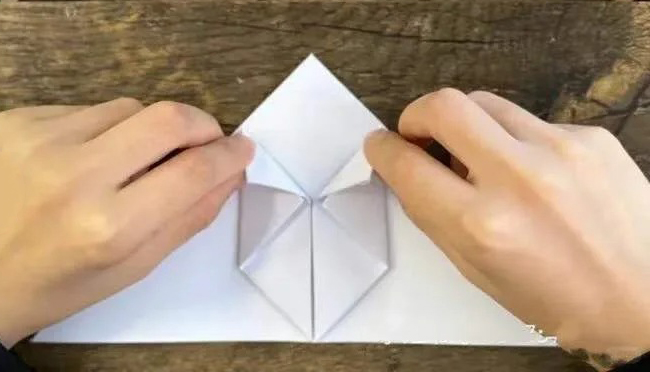
1. Start by preparing your square paper and laying it flat on a clean surface.
2. Fold the paper diagonally to create a triangle, creasing along the fold to mark the center.
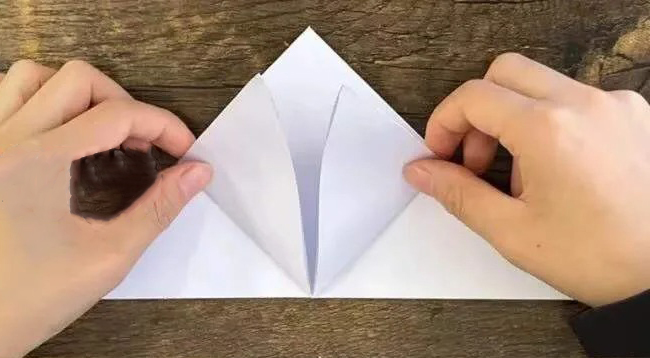
3. Fold the left and right corners of the triangle towards the center, forming two smaller triangles at the bottom.
4. Take the bottom corners of the two smaller triangles and fold them backward, creating a pointed shape.
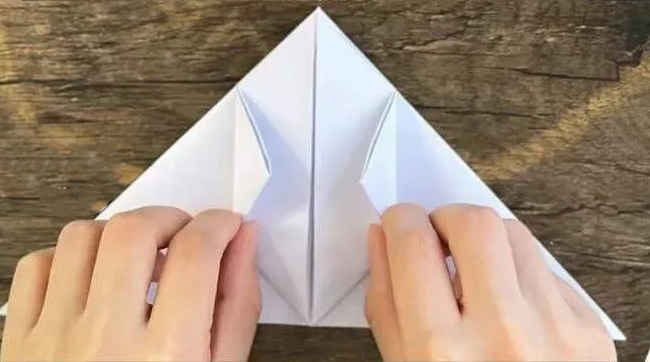
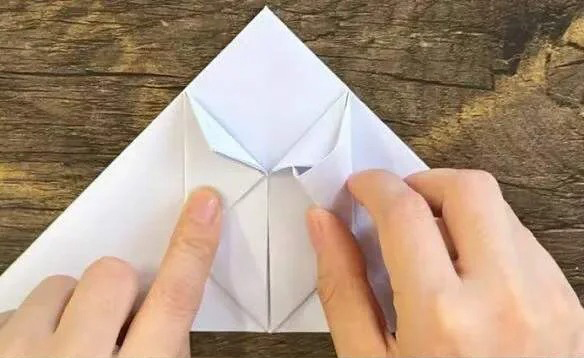
5. Next, fold the top point of the triangle downwards, creasing it firmly.
6. Fold the two side corners of the triangle inwards, aligning them with the center crease.
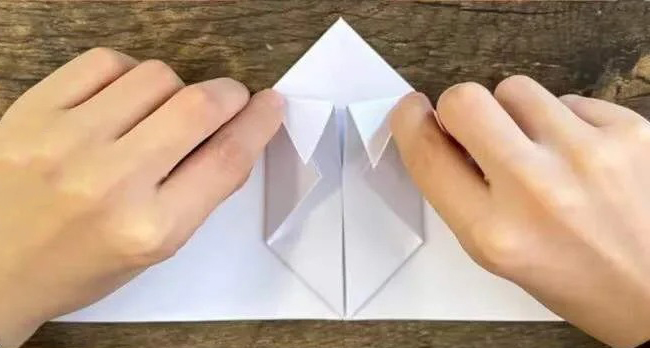
7. Tuck the folded corners into the slots created by the previous folds, securing them in place.
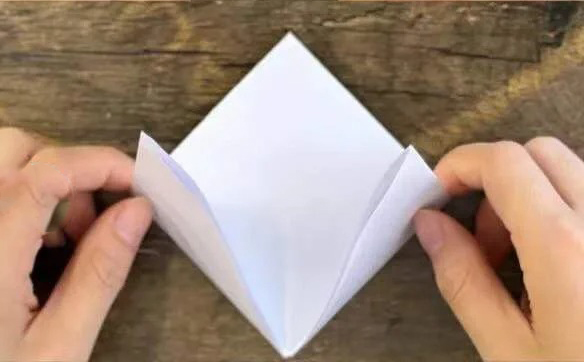
8. Flip the paper over and fold the bottom corners of the triangle upwards, creating the bunny’s feet.
9. Fold the top point of the triangle downwards once again, shaping it into the bunny’s head.
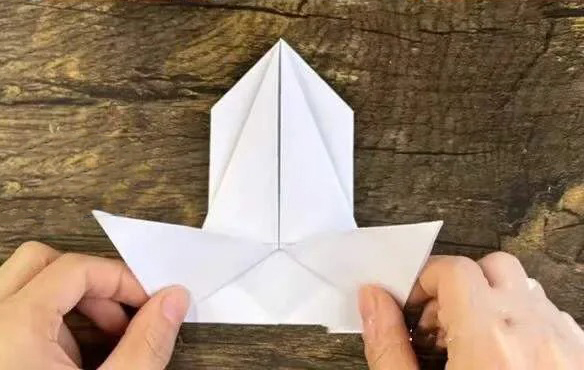
10. Using the creases as a guide, fold the bunny’s ears outward, giving them a cute and floppy appearance.
11. Finally, add a touch of whimsy to your origami bunny by decorating it with dried flowers or other embellishments. Simply apply a small amount of glue to the desired area and carefully attach the decorations.
Voila! Your DIY Easter origami bunny is complete, ready to bring joy and charm to any Easter celebration or decoration. This simple yet delightful craft is sure to impress with its intricate folds and playful design. So gather your materials, unleash your creativity, and enjoy the satisfying process of creating your very own origami masterpiece. Happy folding!
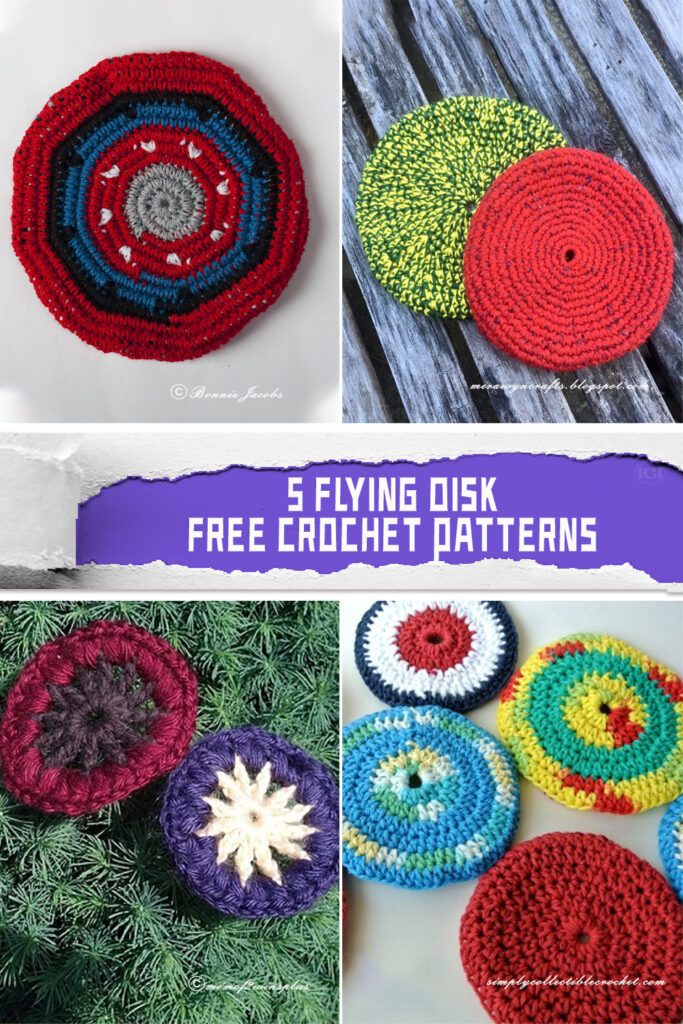
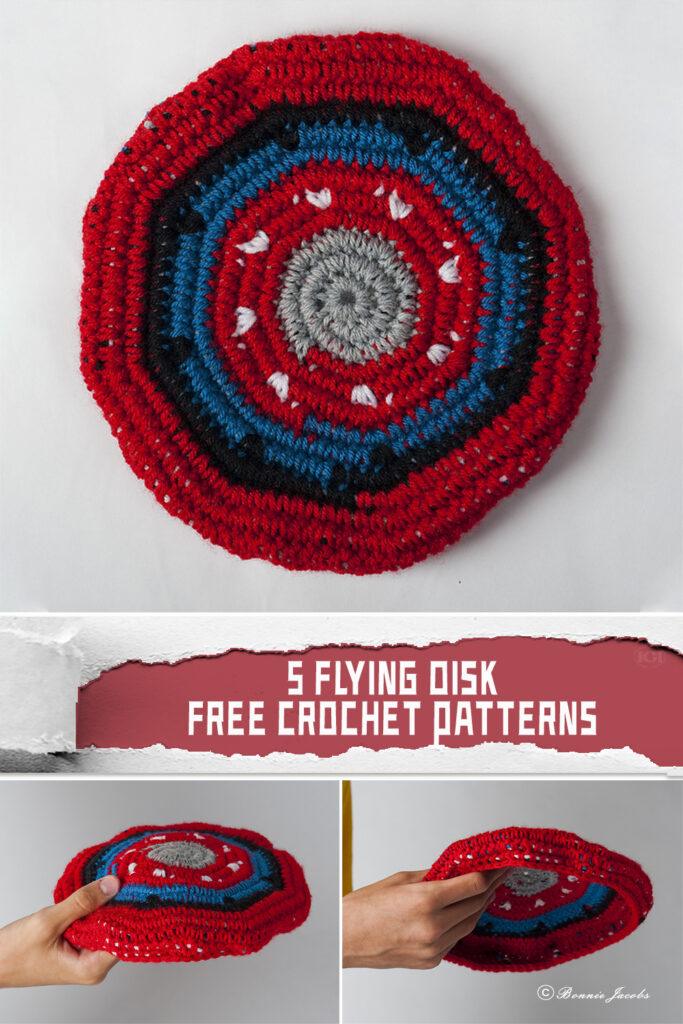
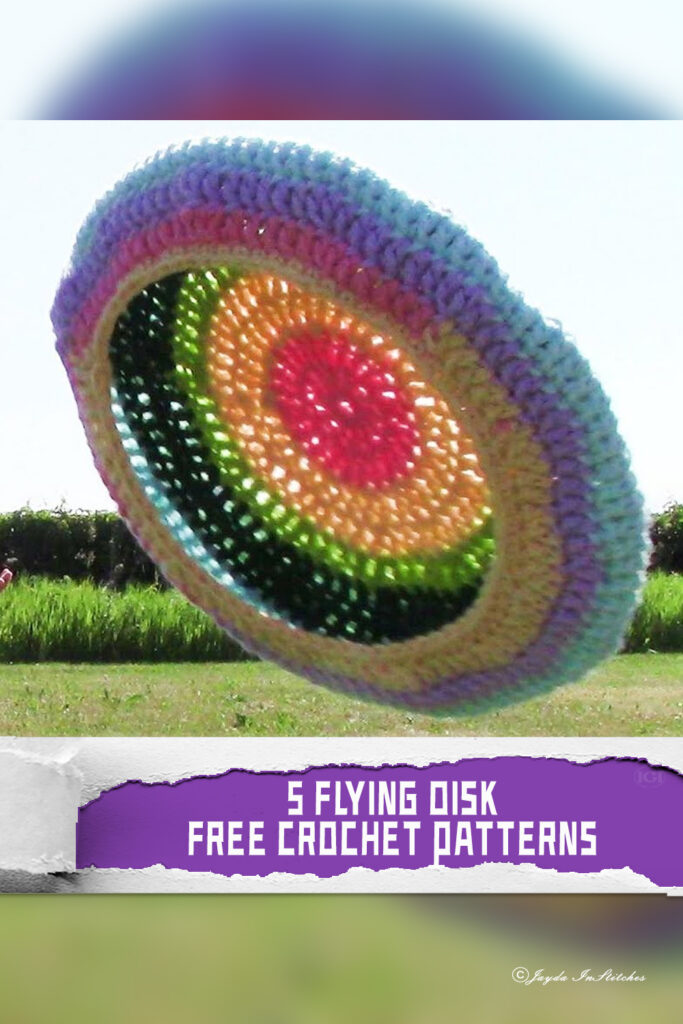
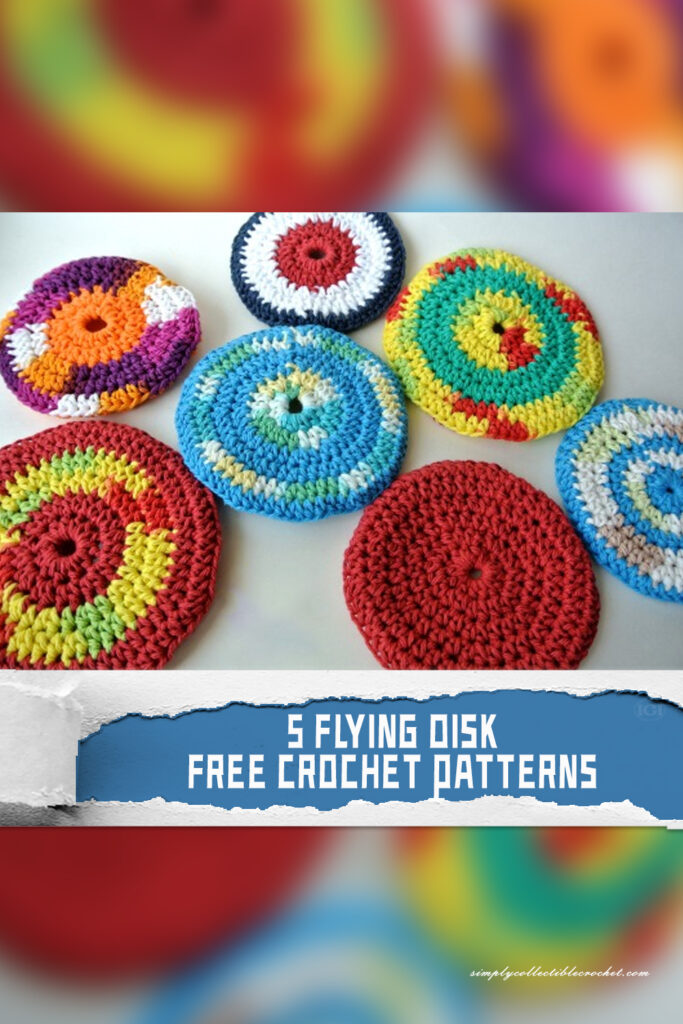
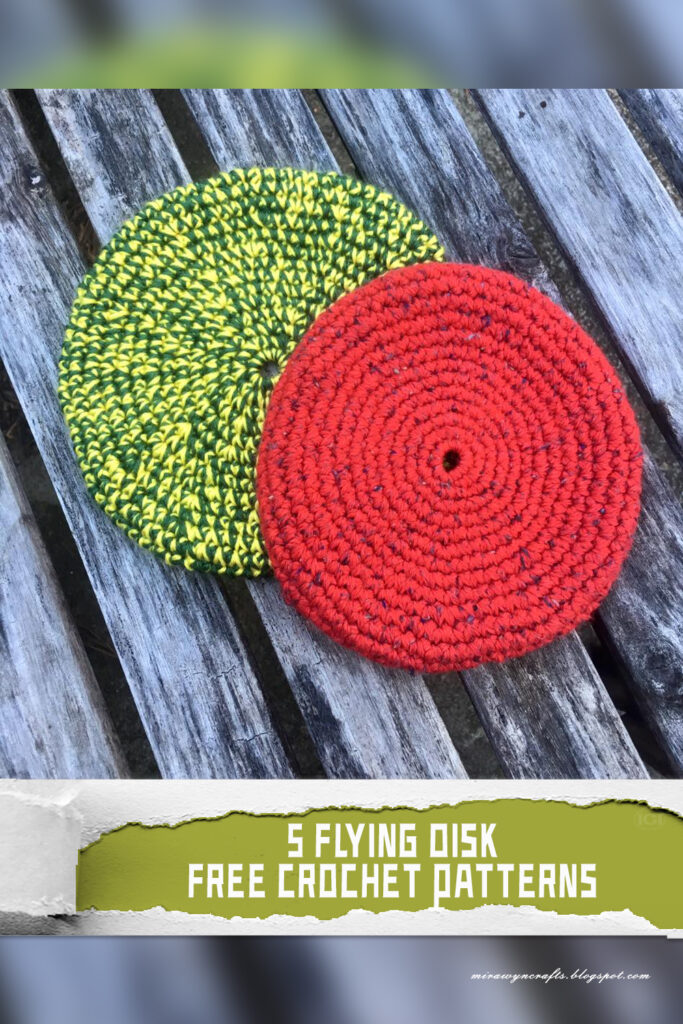
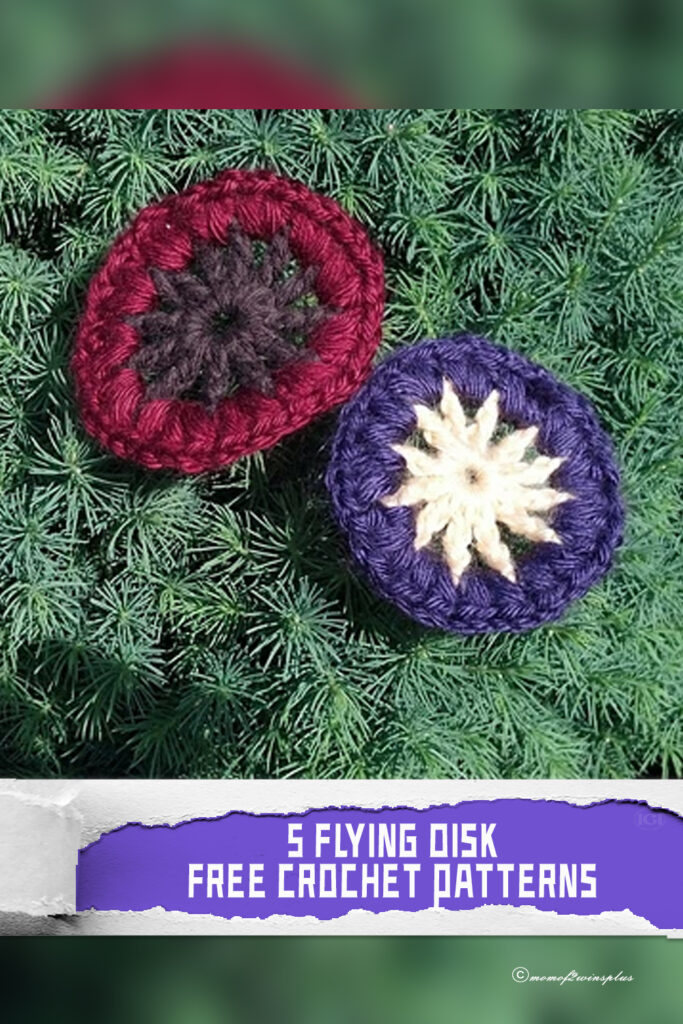
Not only are the flying disk projects enjoyable to make, but they also offer a practical and playful outcome for leisure activities. In this essay, we’ll explore five different free crochet patterns for flying disks, each offering a unique design and approach to the craft. Whether replicating the classic frisbee design, exploring softer alternatives, or experimenting with foldable or miniature versions, crocheters have a variety of patterns to choose from based on their preferences and skill levels. These flying disk crochet patterns provide opportunities for enjoyment and leisure, both in the process of crafting and in the excitement of outdoor play. So grab your yarn and hooks, and let your imagination take flight as you crochet your way to fun-filled adventures in the air! Special thanks to all the designers who generously shared these free Flying Disk Crochet patterns! To access them, just scroll down the page and click on the link below the corresponding image. Happy crafting!
1. The “Frisbee Flyer” pattern by Bonnie Jacobs, presents a classic design resembling the iconic plastic frisbee. With its familiar shape and sturdy construction, this pattern is ideal for those looking to replicate the traditional flying disk experience using crochet. The pattern likely involves techniques such as increases and decreases to achieve the desired shape and stability. Crocheters can choose their preferred colors to customize their frisbee, adding a personal touch to this timeless outdoor toy.
2. For visual learners or those who prefer following along with video instructions, the YouTube tutorial offers an excellent resource for creating a crocheted flying disk. Videos often provide step-by-step guidance, making it easier for beginners to grasp the techniques involved. Additionally, creators may offer tips and tricks to enhance the final product’s durability and performance. This interactive format allows crocheters to pause, rewind, and replay sections as needed, ensuring a smooth crafting experience from start to finish.
3. The “Soft Flyers” pattern from Simply Collectible Crochet introduces a softer alternative to traditional frisbees, making it suitable for indoor play or gentle outdoor activities. This pattern may incorporate softer yarns or padding to achieve a plush texture, offering a comfortable grip and safe play experience, especially for children or pets. The design may feature colorful embellishments or decorative stitches, adding visual interest to the finished product. Soft flyers provide a fun and safe option for casual tossing and catching games indoors or in enclosed spaces.
4. In contrast to rigid frisbees, the “Foldable Flying Disc” pattern from MiraWyn Crafts offers a flexible and collapsible design, making it convenient for storage and travel. Crocheted using lightweight materials and incorporating strategic shaping techniques, this pattern produces a foldable flying disc that can easily fit into a pocket or bag when not in use. The collapsible nature of this design adds an element of versatility, allowing users to bring their crocheted flying disk wherever they go, ready for impromptu outdoor adventures.
5. For those interested in miniature crafts or seeking a quick project, the “Mini Flyer” pattern by Jean Fletcher presents a delightful option. Despite its smaller size, this crocheted flying disk retains the essence of its full-sized counterparts, offering a pint-sized version of the classic outdoor toy. Mini flyers are perfect for decorative purposes, party favors, or miniature games requiring precision and agility. Crocheters can experiment with different yarn weights and hook sizes to customize the size and flight characteristics of their mini flyers.
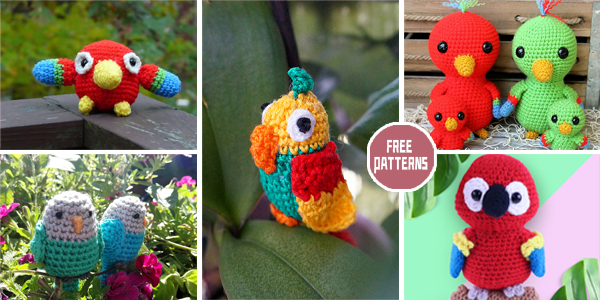
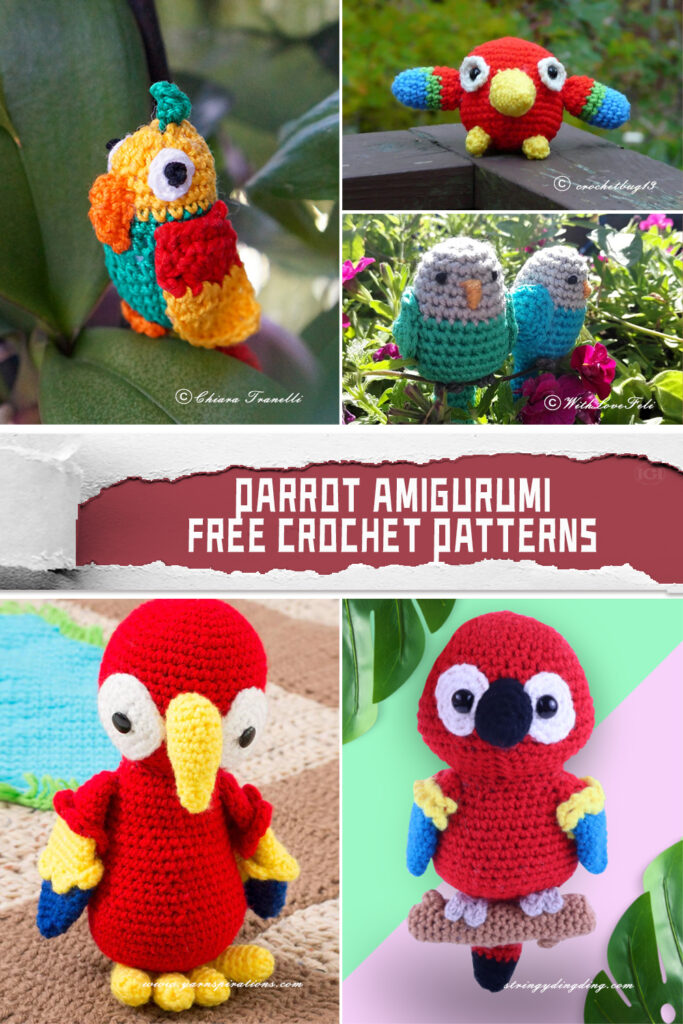
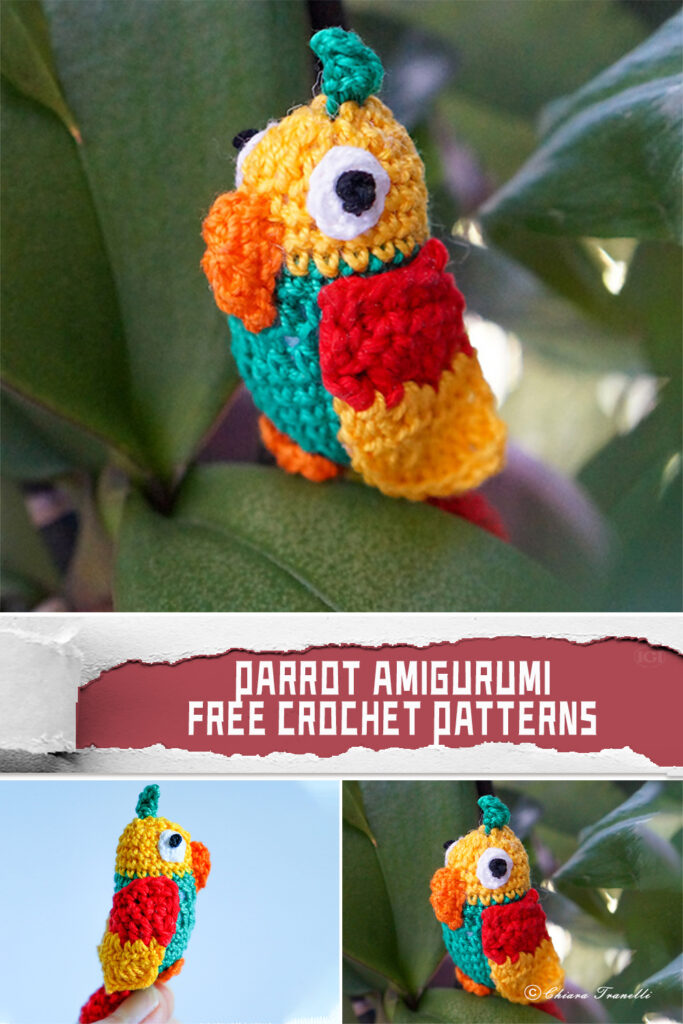
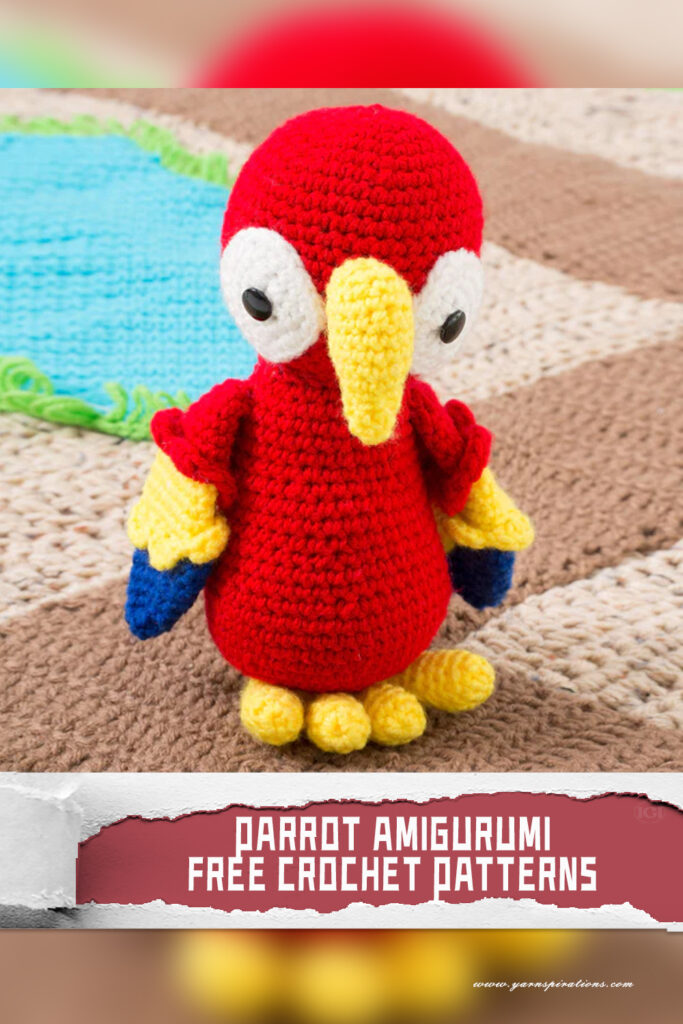
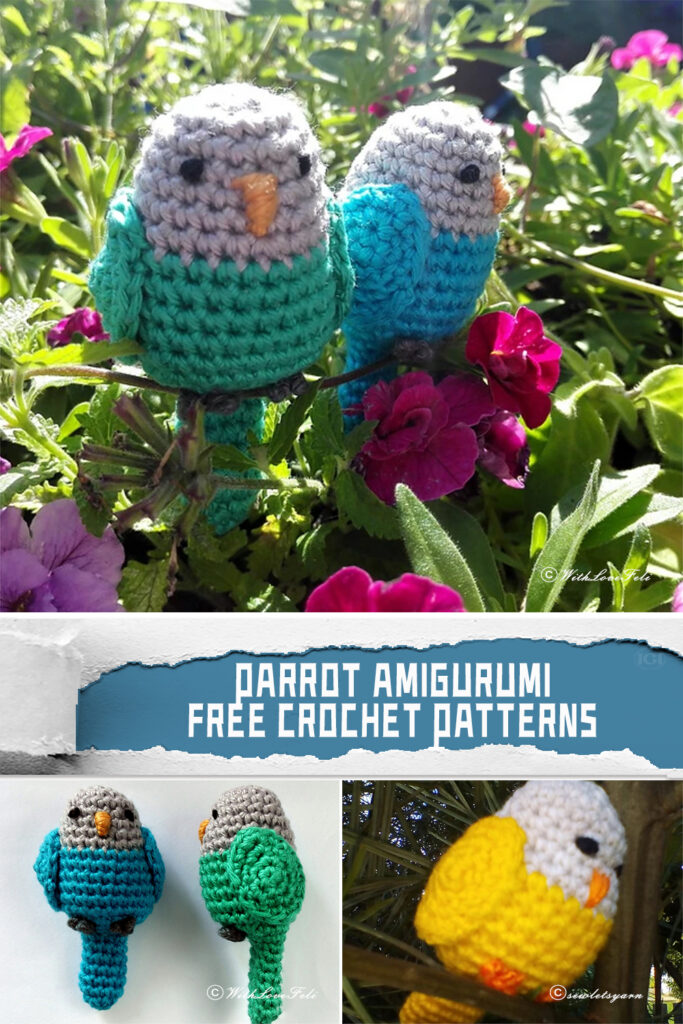
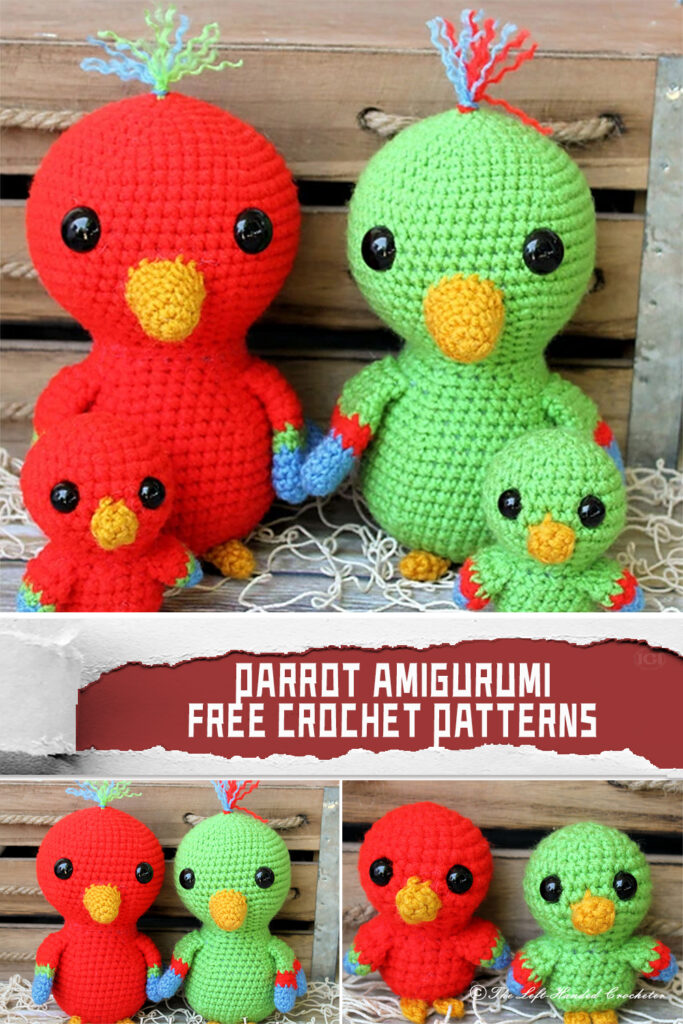
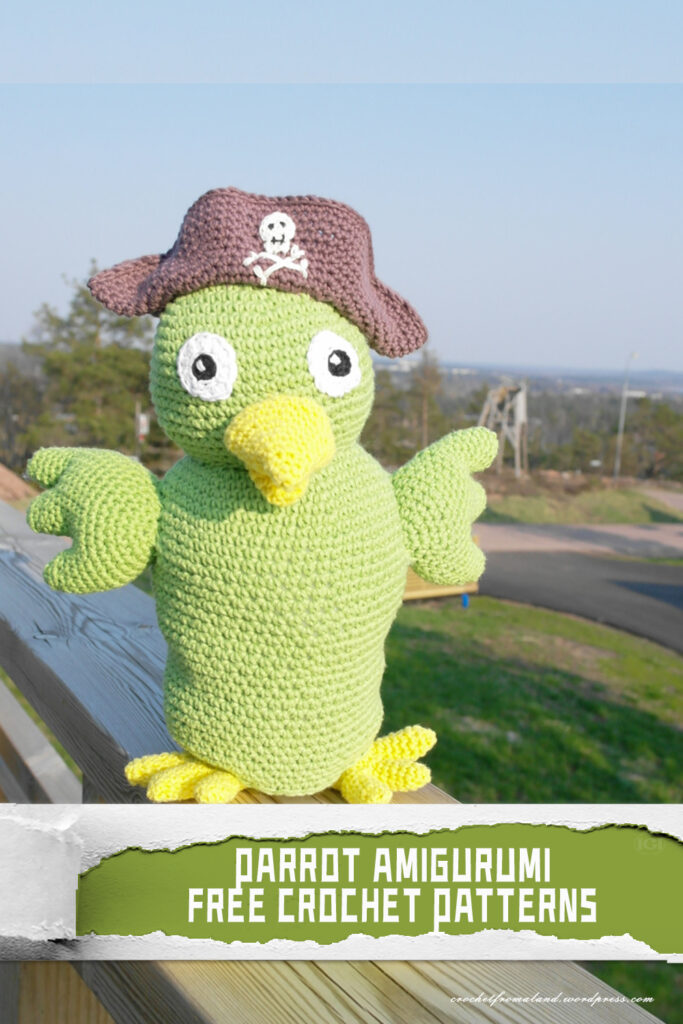
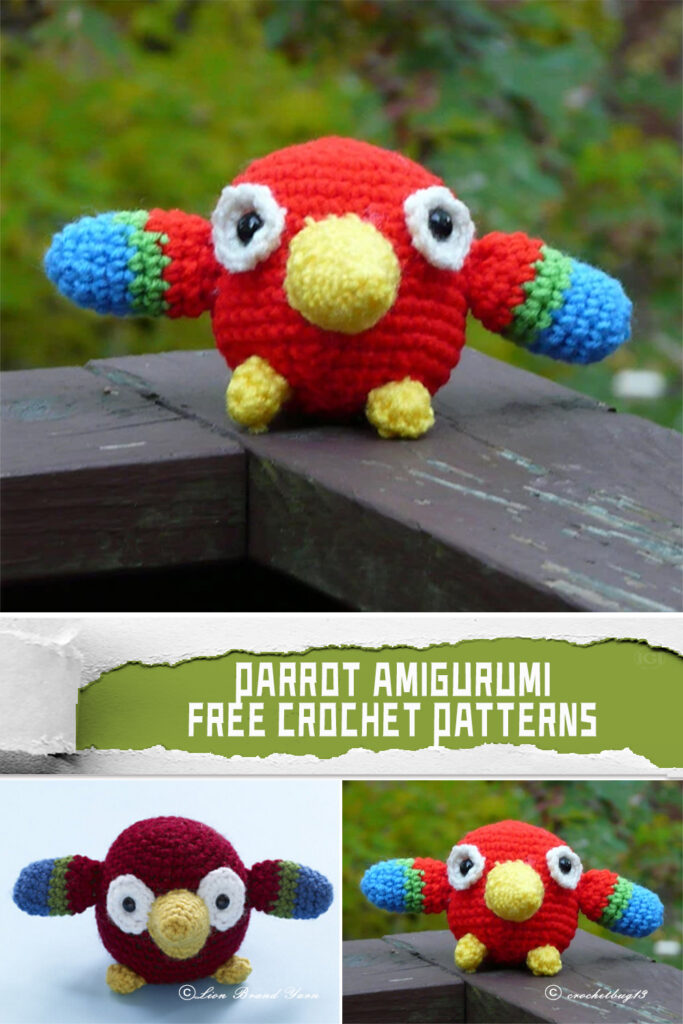
Amigurumi parrots offer a delightful blend of creativity, craftsmanship, and charm. In this essay, we will explore seven free crochet patterns that celebrate the beauty of parrots in amigurumi form.From the intricate details of Feli’s Parrot Pattern to the whimsical adventure of Captain Jack Parrot, each free crochet pattern invites crafters on a unique journey of exploration and expression. Whether you’re a seasoned crocheter or just beginning your crafting adventure, these seven patterns provide a wonderful opportunity to unleash your imagination and bring a little piece of the vibrant parrot world into your own home.Special thanks to all the designers who generously shared these free Parrot Amigurumi Crochet patterns! To access them, just scroll down the page and click on the link below the corresponding image. Happy crafting!
1. The first pattern, “Paco the Parrot Amigurumi,” exudes personality and charm. Designed by Chiara Tranelli, this pattern offers detailed instructions for creating a whimsical parrot companion. With its bright colors and endearing expression, Paco brings joy to any crochet enthusiast’s collection.
2. Yarnspirations presents “Red Heart Parrot Pals,” a playful pattern that allows crafters to make adorable parrot buddies. Featuring Red Heart Super Saver yarn, this design offers versatility and durability, perfect for crafting cherished amigurumi toys. With clear instructions and vibrant color options, Parrot Pals is an ideal project for both beginners and experienced crocheters alike.
3. Feli’s Parrot Pattern, available on withlovefeli.com, showcases a delightful parrot design with intricate details. Crafted by Feli, a talented crochet artist, this pattern offers a unique twist on traditional amigurumi techniques. From its intricately crocheted feathers to its expressive eyes, Feli’s parrot captivates with its lifelike appearance.
4. For left-handed crocheters seeking delightful amigurumi projects, Left-Handed Crocheter presents a charming parrot pattern. With step-by-step instructions tailored specifically for left-handed crafters, this pattern ensures inclusivity and accessibility within the crochet community. These adorable parrots are a testament to the creativity and adaptability of crochet enthusiasts worldwide.
5. Inspired by the legendary Captain Jack Sparrow, this free crochet pattern from crochetfromaland.wordpress.com offers a whimsical take on pirate-themed amigurumi. Complete with a tricorn hat and a mischievous grin, Captain Jack Parrot is sure to spark imagination and adventure. Crafters can embark on a crochet journey filled with swashbuckling fun as they bring this character to life.
6. Lion Brand Yarn presents an enchanting amigurumi parrot pattern that showcases the company’s dedication to quality and creativity. With its signature Lion Brand Vanna’s Choice yarn, this pattern offers superior softness and vibrant color options. Whether perched on a shelf or nestled in a child’s arms, the Lion Brand Amigurumi Parrot is sure to become a beloved companion.
7. Rounding out our list is Stringy Ding Ding’s Parrot Amigurumi pattern, a whimsical design brimming with personality. This free crochet pattern combines simplicity with charm, making it an ideal project for crafters of all skill levels. With its playful demeanor and bright colors, Stringy Ding Ding’s Parrot Amigurumi brings joy to crochet enthusiasts around the world.
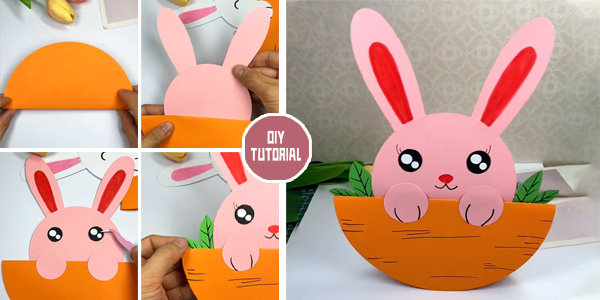
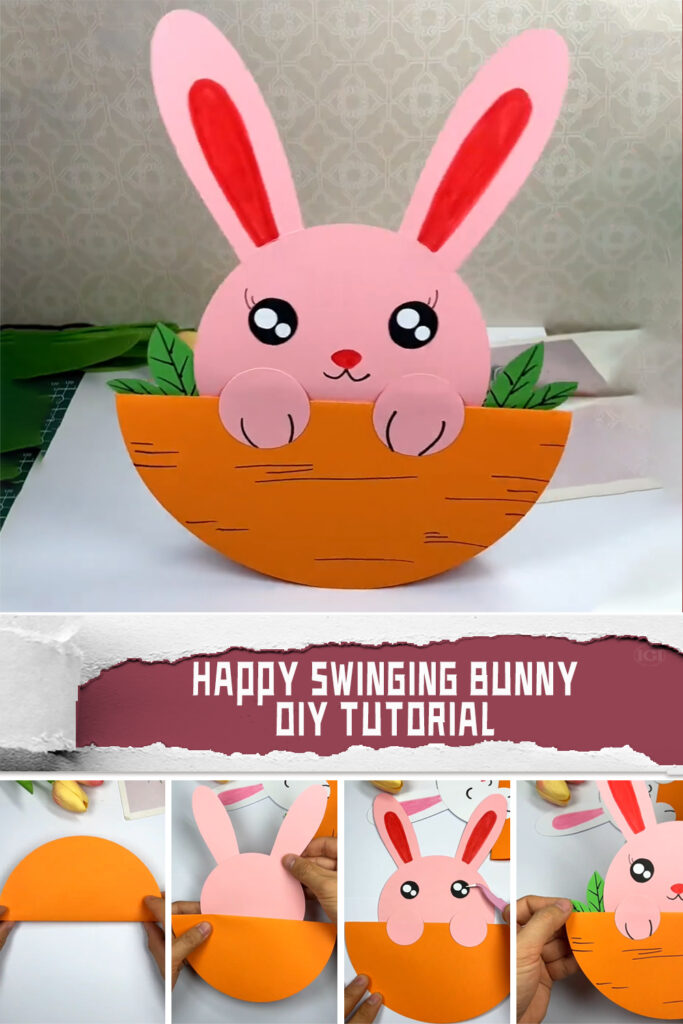
Are you ready to embark on a delightful crafting journey? Let’s dive into creating a Happy Swinging Bunny! With just a few simple materials and a touch of creativity, you can bring this adorable bunny to life and add a sprinkle of joy to any space. Follow along with these step-by-step instructions to craft your own charming swinging bunny decoration:
1. To begin, gather a circular piece of cardstock. Fold it neatly in half, forming a perfect semi-circle. This will serve as the base of your swinging bunny’s crib, providing stability and support for the whimsical creation to come.
2. Now, it’s time to fashion the bunny’s head. Take another circular piece of cardstock and carefully cut out the shape of bunny ears from a fresh sheet of cardstock. These ears will give your swinging bunny its distinctive charm and personality.
3. For the bunny’s hands, use two small circular pieces of cardstock. These will be attached to the swinging mechanism, allowing your bunny to playfully sway back and forth.
4. With the basic structure in place, it’s time to add some color and character to your swinging bunny. Grab a paintbrush and gently brush on vibrant hues to the bunny’s ears, infusing them with life and vibrancy. Then, affix eyes, a cute little nose, and any other decorative elements you desire to give your bunny its unique flair.
5. To complete the look, adorn the semi-circle cardstock base with whimsical plant decorations. Whether it’s colorful flowers, lush greenery, or tiny mushrooms, these additions will elevate your swinging bunny’s charm and create a delightful scene for it to inhabit.
Voila! With a few simple steps, your DIY Happy Swinging Bunny is ready to spread joy and cheer wherever it goes. Hang it in a nursery to enchant little ones, display it in a cozy corner of your home to brighten up your day, or gift it to a loved one as a token of your affection. Get creative with colors, patterns, and decorations to make your swinging bunny truly one-of-a-kind. Enjoy the process of crafting and let your imagination run wild as you bring this charming creation to life!
Here is the video tutorial for DIY Happy Swinging Bunny:
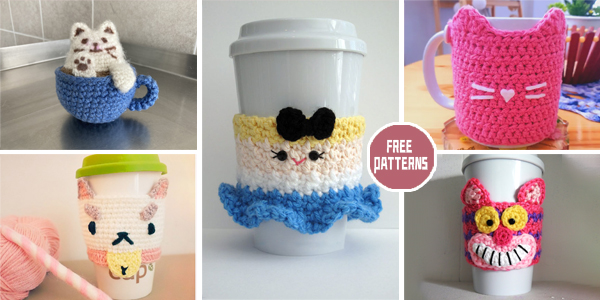
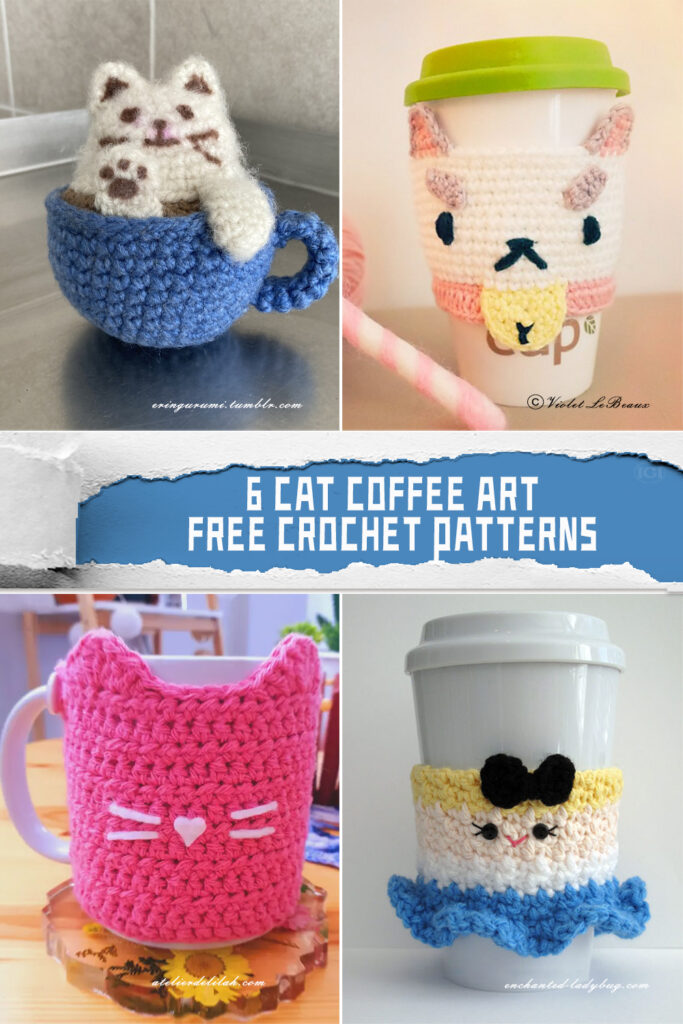
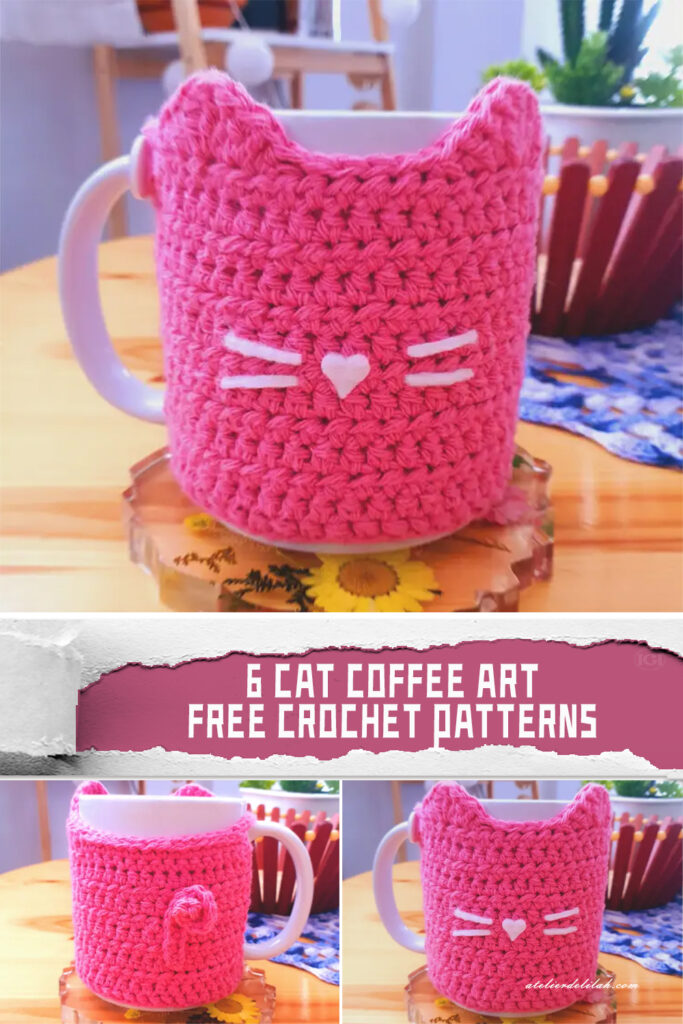
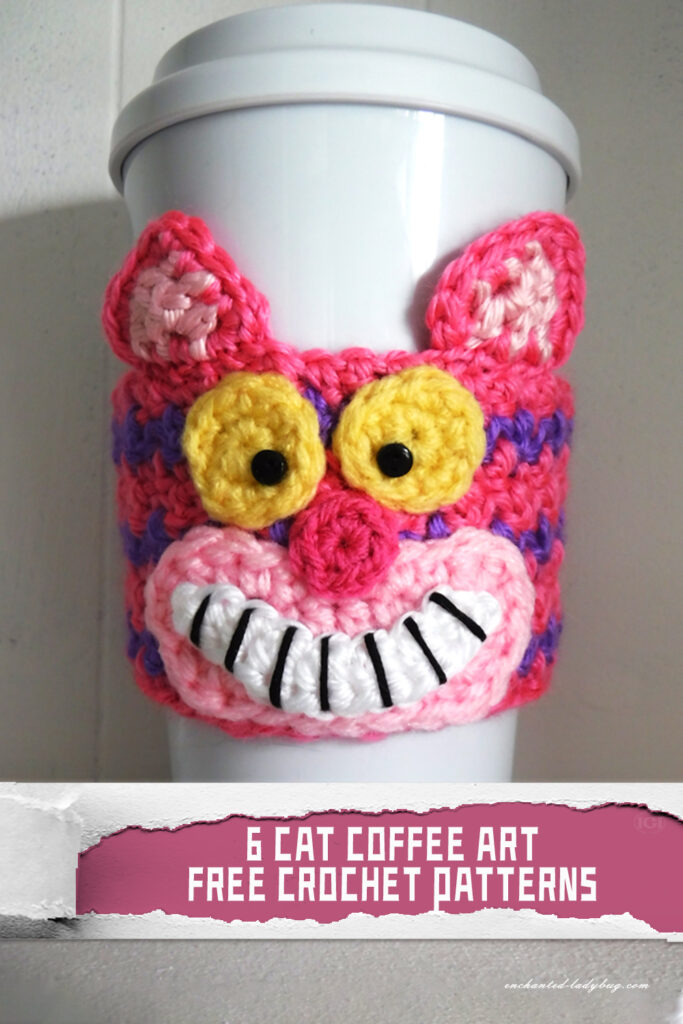
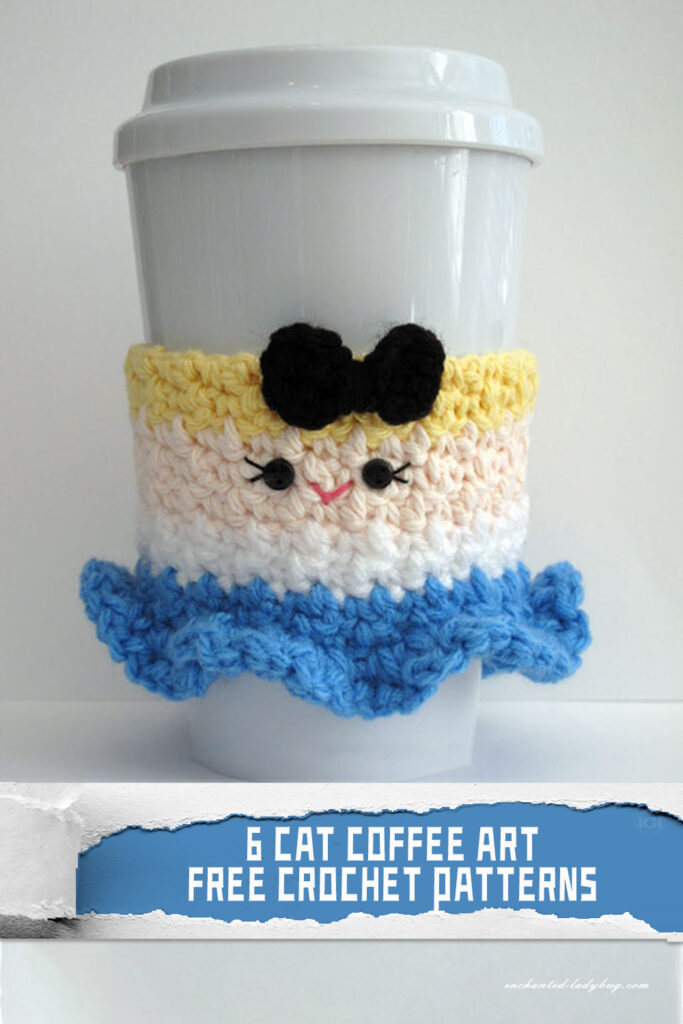
Cat coffee art crochet patterns offer a delightful blend of creativity, charm, and practicality, allowing crocheters to express their love for feline friends while adding a touch of whimsy to their daily coffee routine. In this essay, we delve into six adorable and free cat coffee art crochet patterns, each offering its unique blend of creativity and charm. Whether you’re a beginner looking for a simple project or an experienced crocheter seeking a new challenge, these free patterns offer something for everyone, inviting you to unleash your creativity and embark on a crochet adventure that’s sure to warm both your hands and your heart. Special appreciation goes out to all the designers who generously shared these FREE Cat Coffee Art Crochet Patterns! To access them, simply scroll down the page and click the links located below the respective pictures. Happy crafting!
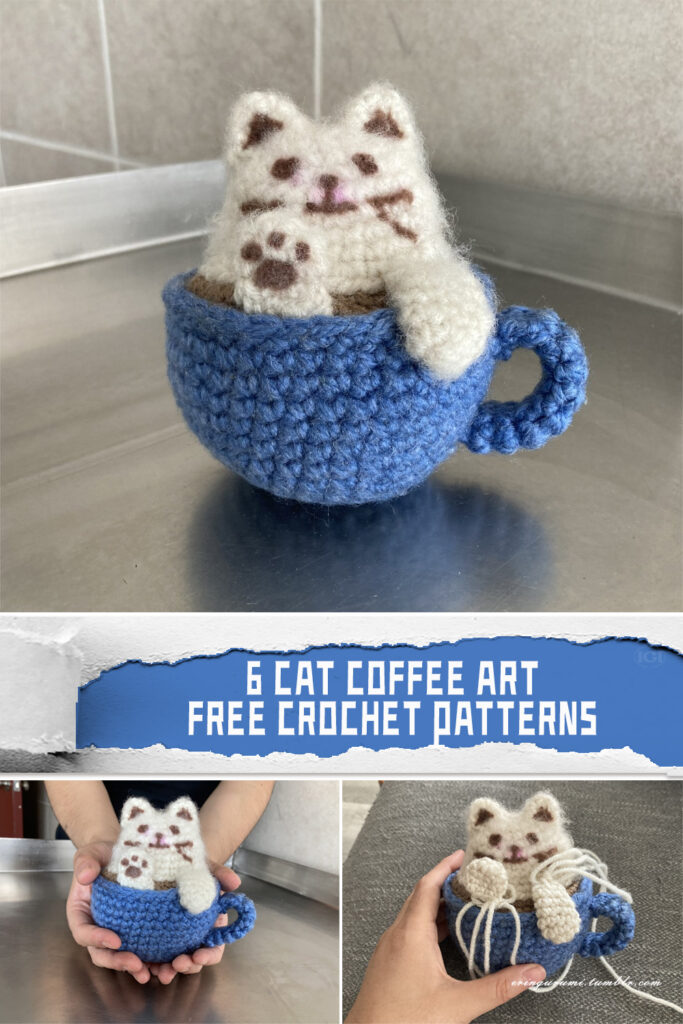
1. The Cat Latte Art pattern, available on Tumblr, brings the whimsical world of cat-themed coffee art to life through crochet. This pattern features a cute cat peeking out from the edge of a coffee cup, adding a playful touch to your morning routine. With its simple yet detailed design, this pattern is perfect for beginners and experienced crocheters alike, offering an opportunity to showcase their skills while indulging in their love for cats and coffee.
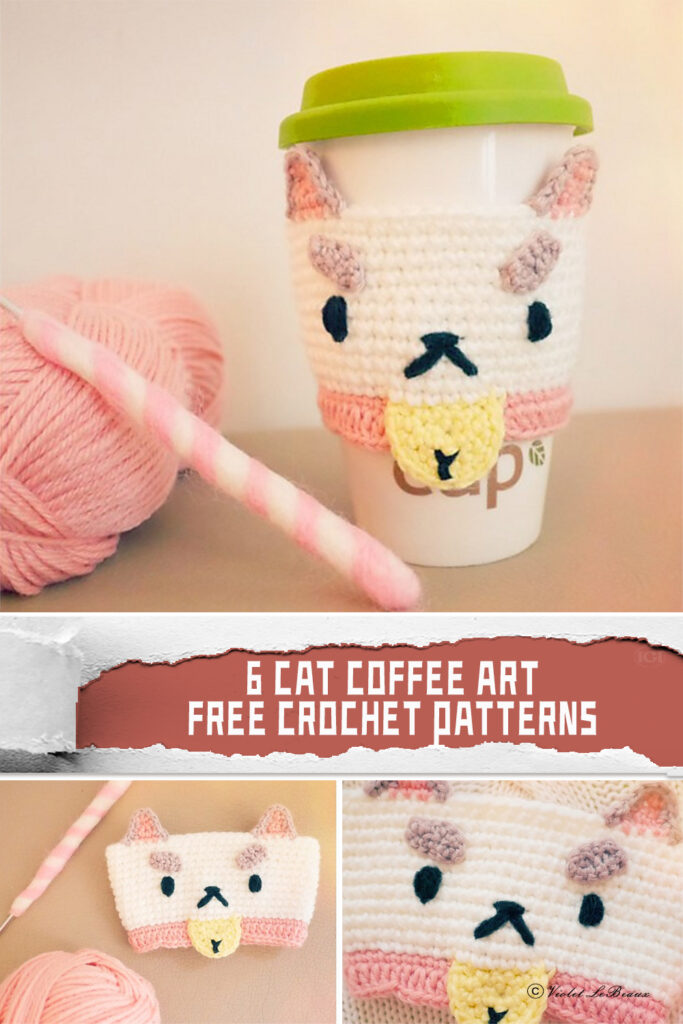
2. While not a cat per se, the Puppycat Cup Cozy pattern by Violet LeBeaux offers a delightful twist on the traditional cat coffee art motif. This pattern features a charming puppycat design wrapped snugly around a coffee cup, adding both style and functionality to your beverage.
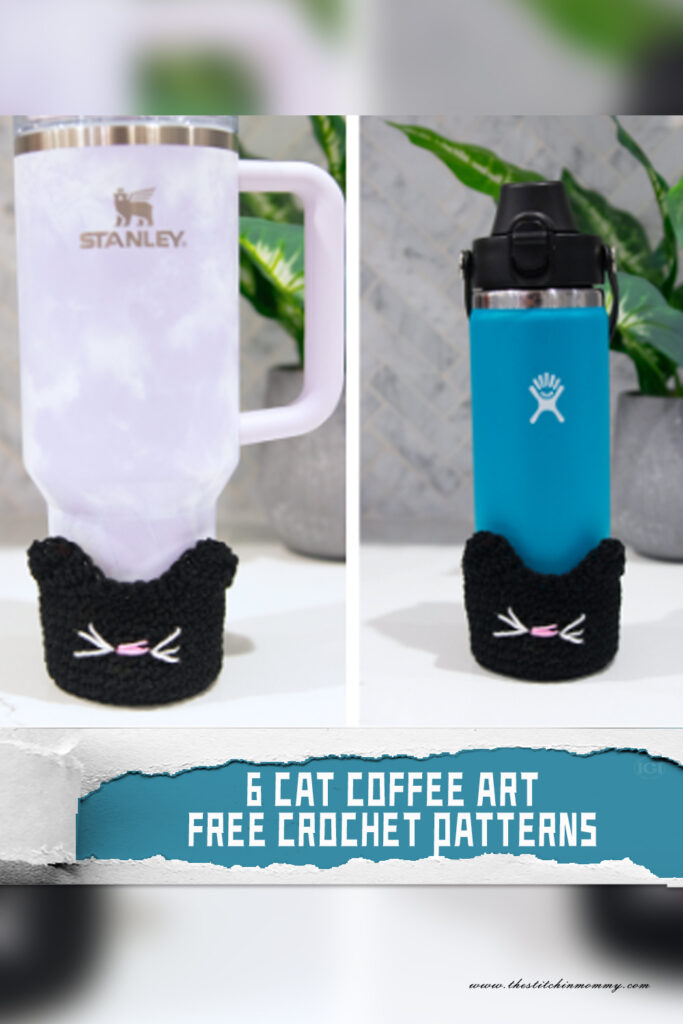
3. The Black Cat Tumbler Boot pattern, available on The Stitchin’ Mommy website, combines practicality with adorable cat-themed design. This pattern features a cozy boot-shaped cover adorned with the likeness of a black cat, perfect for keeping your tumbler insulated and your beverage at the perfect temperature.
4. Atelier Delilah’s Crochet Mug Cozy Cat pattern offers a whimsical take on the classic cat coffee art motif. This pattern features a charming cat face design embellished with ears and whiskers, transforming an ordinary mug into a playful and eye-catching accessory. With its quick and easy construction, this pattern is suitable for crocheters of all skill levels, making it the perfect project for a cozy night in or a thoughtful handmade gift.
5. Inspired by the whimsical world of Alice in Wonderland, the Cheshire Cat Coffee Cup Cozy pattern by Enchanted Ladybug adds a touch of fantasy to your morning routine. This pattern features a grinning Cheshire Cat motif wrapped around a coffee cup, complete with vibrant colors and quirky details. With its playful design and easy-to-follow instructions, this pattern is sure to delight crocheters of all ages and skill levels, inviting them to embark on a whimsical crochet adventure.
6. Rounding out our list is the Alice Coffee Cup Cozy pattern, also by Enchanted Ladybug, which pays homage to the beloved protagonist of Alice in Wonderland. This pattern features a whimsical Alice motif wrapped around a coffee cup, complete with her iconic blue dress and flowing blonde hair. With its charming design and nostalgic appeal, this pattern offers crocheters the opportunity to bring a touch of magic to their morning routine and celebrate their love for literature and crochet alike.
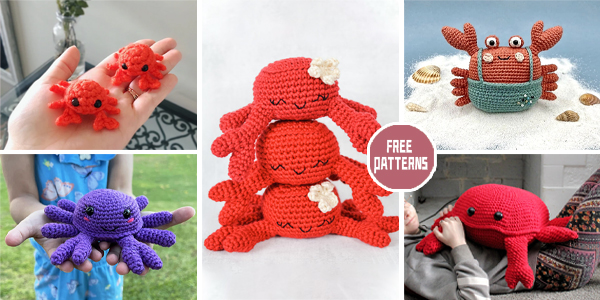
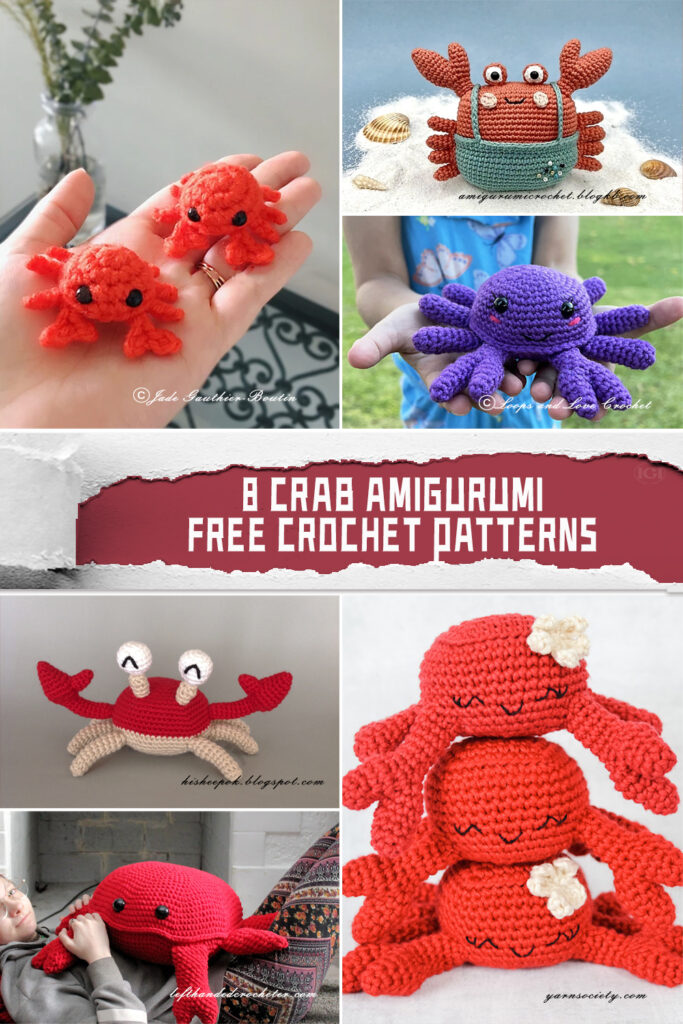
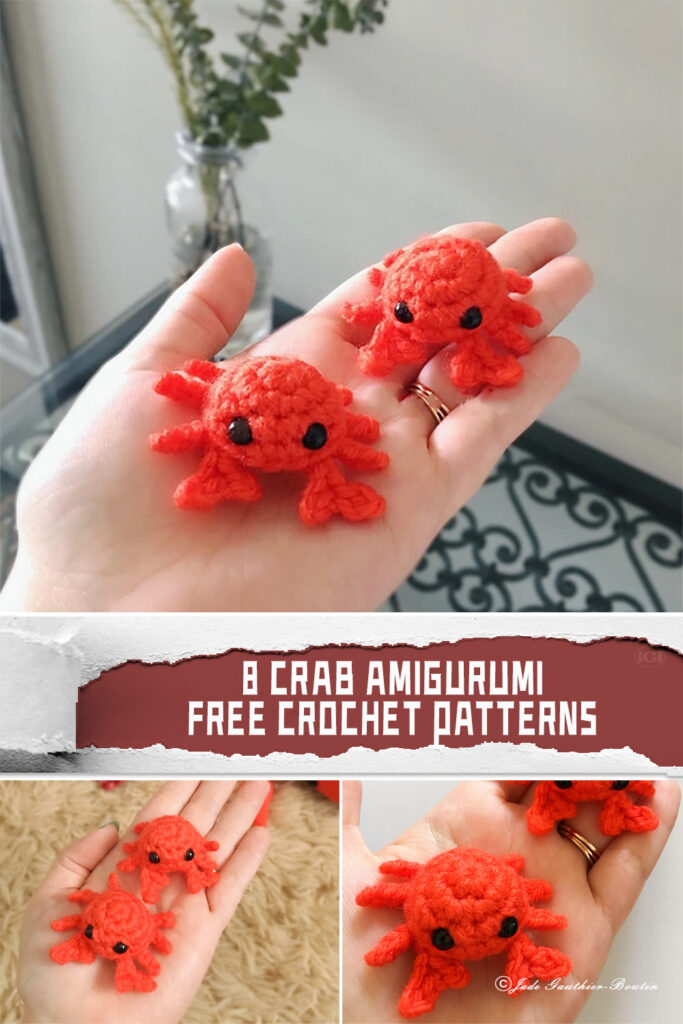
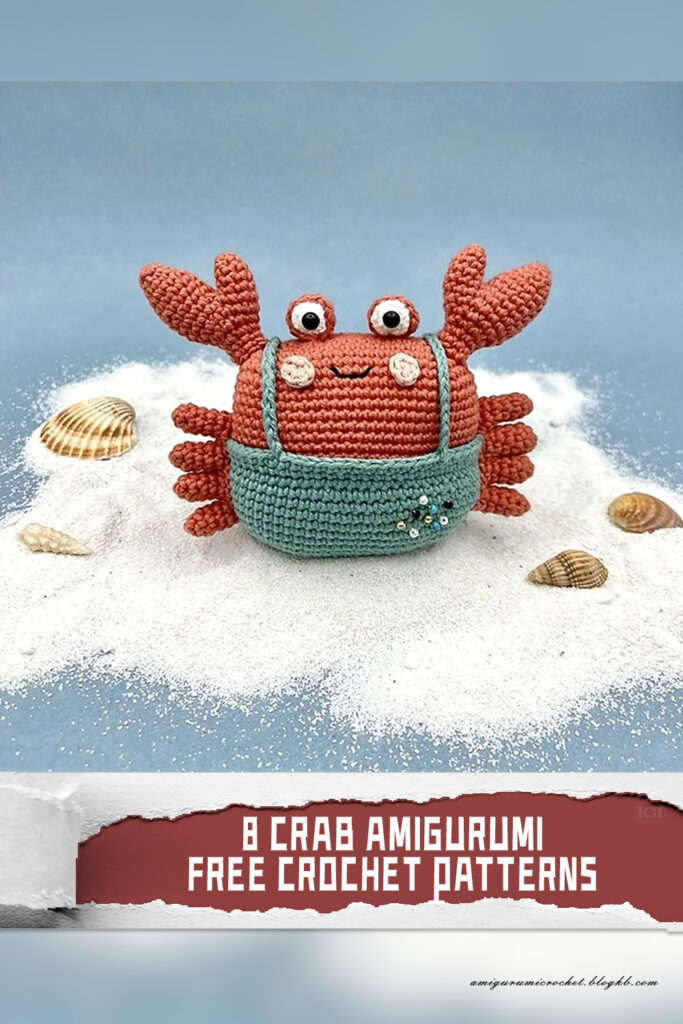
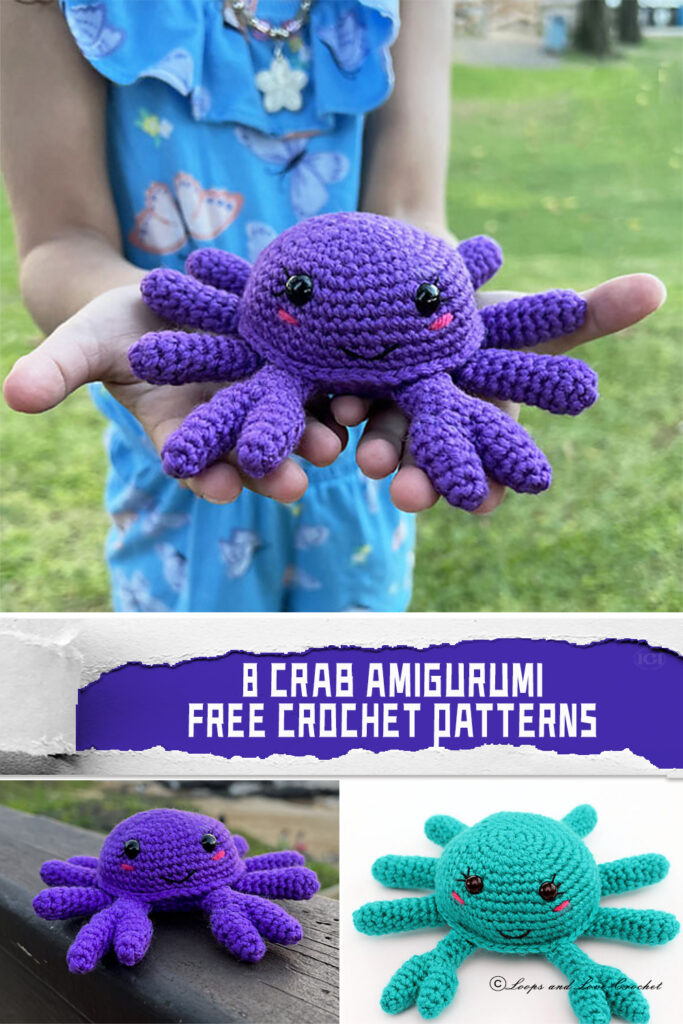
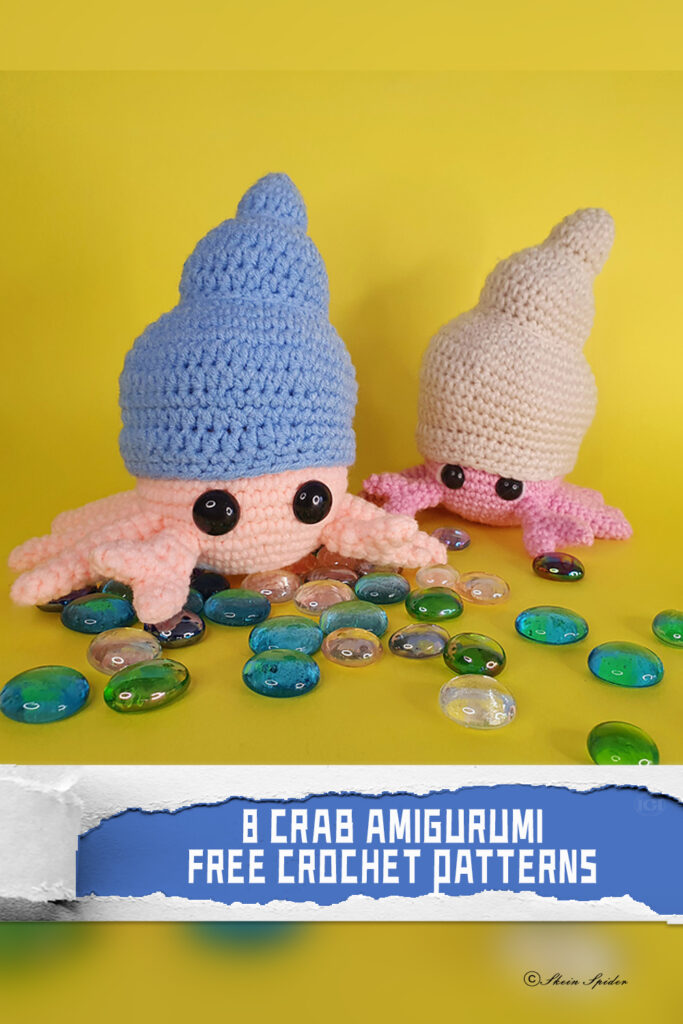
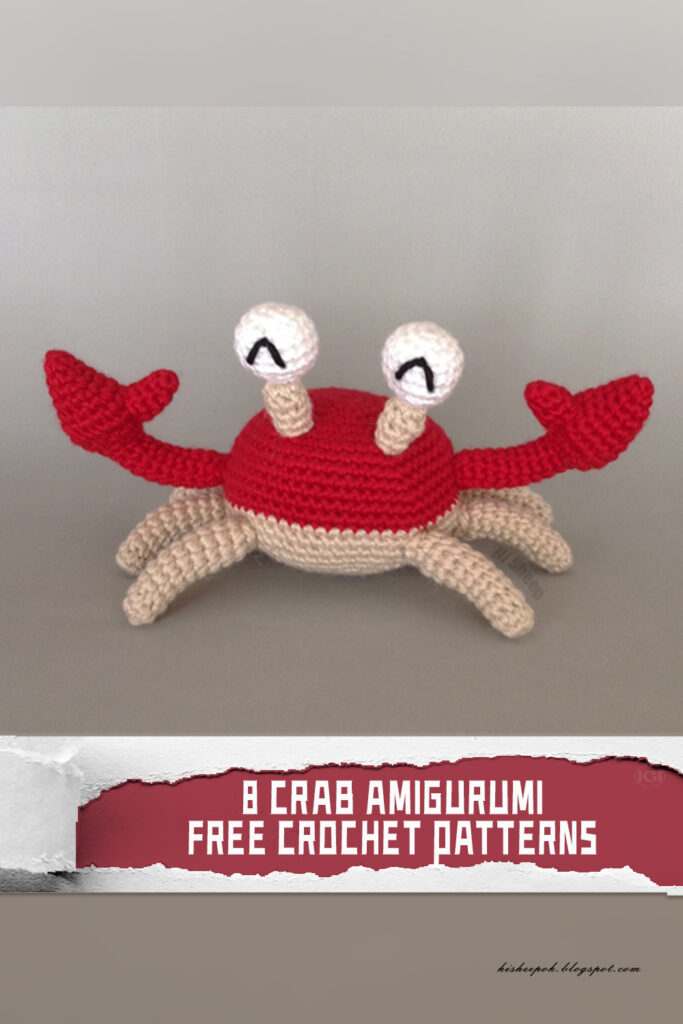
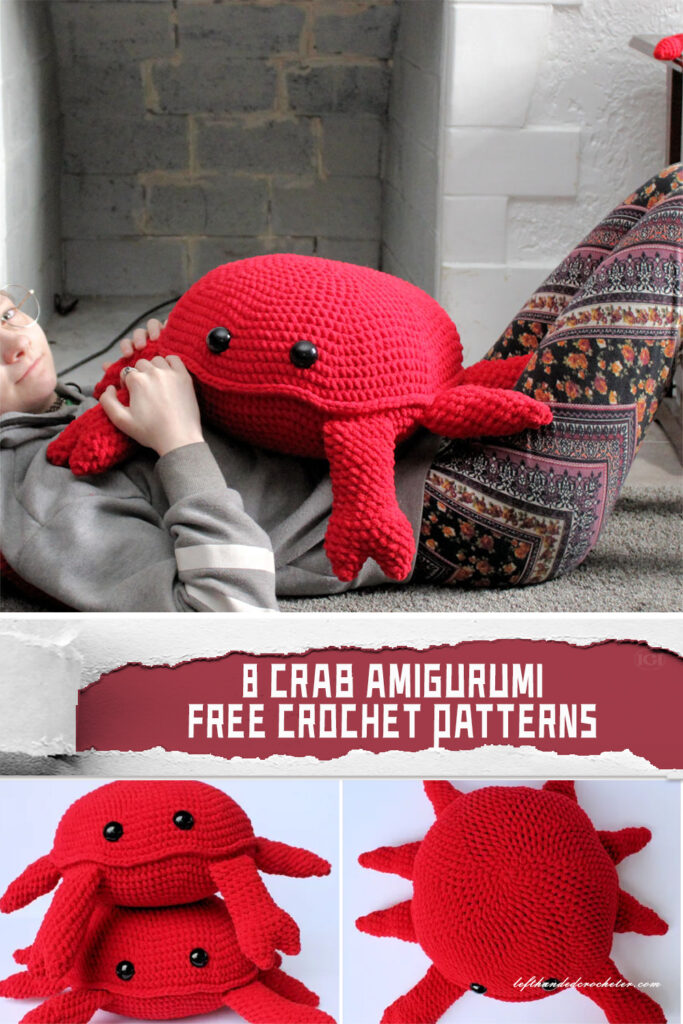
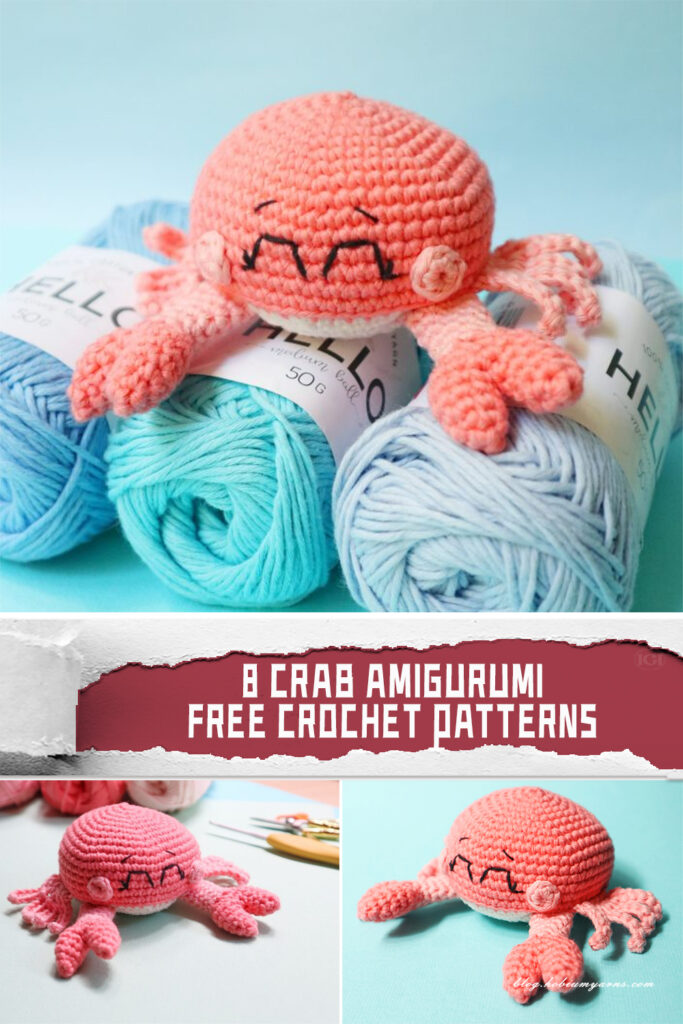
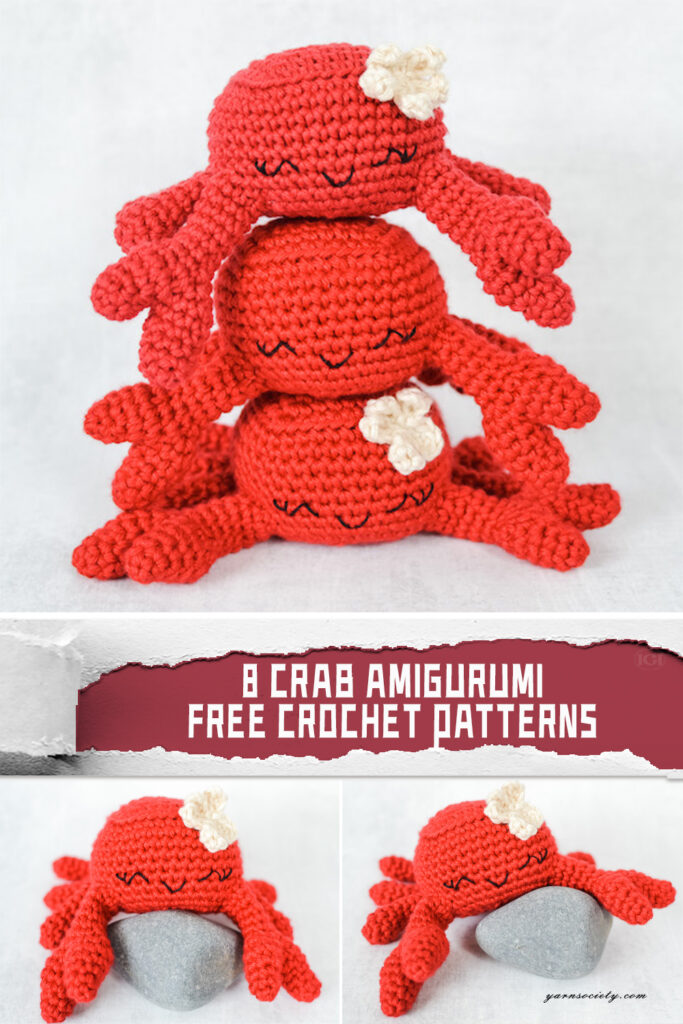
The world of crab amigurumi is as vast and varied as the ocean itself, with each pattern offering its own unique take on these beloved creatures. In this essay, we delve into the world of crab amigurumi with eight delightful free crochet patterns. From playful baby crabs to sophisticated shell-dwellers, these free crochet patterns invite crocheters of all skill levels to explore their creativity and craft their own adorable crustacean companions. Whether gifted to a loved one or kept as a cherished keepsake, these amigurumi crabs serve as delightful reminders of the joy and wonder that crochet can bring into our lives. Special appreciation goes out to all the designers who generously shared these FREE Crab Amigurumi Crochet Patterns! To access them, simply scroll down the page and click the links located below the respective pictures. Happy crafting!
1. Sarah Lyons’ “Baby Crabs” pattern by Jade Gauthier-Boutin, introduces us to a trio of tiny crustaceans bursting with personality. These miniature marvels feature rounded bodies and oversized claws, perfect for snuggles or playtime with little ones. With their simple yet expressive design, these baby crabs are an ideal project for beginners looking to dive into the world of amigurumi.
2. The “Crab Amigurumi” pattern by Amigurumi Crochet, shared on their blog, brings a touch of whimsy to the crochet world. This pattern showcases a cheerful crab with vibrant colors and playful details, such as its rosy cheeks and googly eyes. Crocheters can personalize their creations by experimenting with different yarn colors and embellishments, making each crab as unique as its creator.
3. Loops and Love Crochet’s “Crab Amigurumi Crochet Pattern” offers a charming take on these beloved sea creatures. With its detailed instructions and step-by-step photos, this pattern guides crocheters through the creation of a delightful crab, complete with textured shell and adorable pincers. Whether displayed as décor or gifted to a marine enthusiast, this amigurumi crab is sure to delight.
4. Sarah Lyons strikes again with her “Hermit Crab” pattern by Skein Spider. This whimsical design puts a twist on the traditional crab motif by incorporating the unique characteristics of a hermit crab, including its shell-dwelling lifestyle. Crocheters can have fun customizing their hermit crabs with different shell patterns and colors, adding a touch of personality to each creation.
5. “Beachy Crab,” a free pattern shared on hisheepok’s blog, captures the carefree spirit of seaside adventures. This adorable crab features a floppy hat and sunglasses, ready to soak up the sun and enjoy a day at the beach. With its playful accessories and relaxed demeanor, this amigurumi crab is sure to bring a smile to anyone’s face.
6. Left-Handed Crocheter’s “Giant Crab” pattern offers a larger-than-life take on these charming crustaceans. This oversized amigurumi is perfect for crocheters looking to make a bold statement with their creations. Despite its size, this giant crab retains all the adorable details of its smaller counterparts, from its pinch-worthy claws to its endearing expression.
7. “Candy the Crab,” a pattern featured on Hobium Yarns’ blog, adds a sweet twist to the world of crab amigurumi. This charming design features a candy-inspired color palette and adorable heart-shaped eyes, making it as delightful to look at as it is to create. Crocheters can have fun experimenting with different yarn textures and colors to bring their own unique vision of Candy to life.
8.Yarn Society’s “Celia the Crab” pattern introduces us to a sophisticated crustacean with a touch of elegance. This amigurumi crab is adorned with a dainty bow and intricate shell detailing, showcasing the versatility of crochet as an art form. Whether displayed as décor or cherished as a handmade treasure, Celia is sure to add a touch of whimsy to any space.
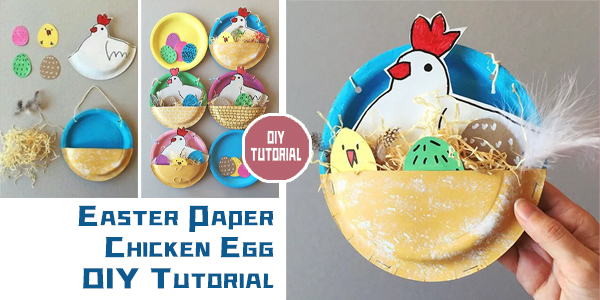
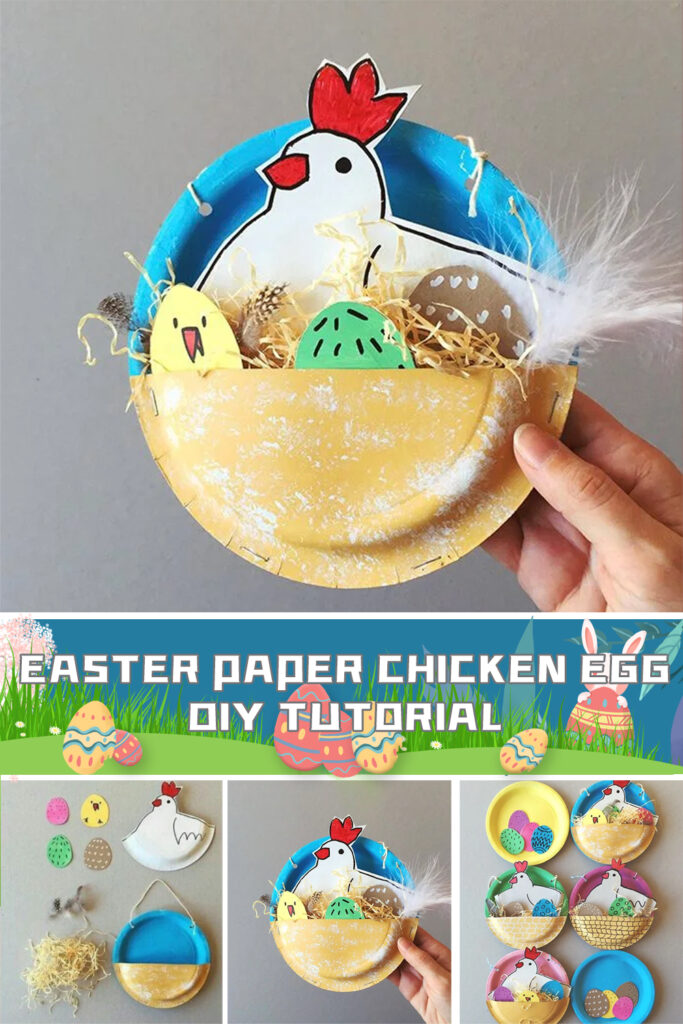
Are you looking for a fun and creative Easter craft project? Look no further! With just a few simple materials, you can create adorable DIY Easter Paper Chicken and eggs to decorate your home for the holiday. Here’s a step-by-step tutorial to guide you through the process:
Materials Needed for DIY Easter Paper Chicken:
Disposable paper plate
Raffia
White cardstock
Colored cardstock
Feathers
Scissors
Permanent marker
Instructions:
1. Start by drawing a cute chicken shape on the white cardstock.
2. Use scissors to carefully cut out the chicken shape.
3. Next, draw several egg shapes on the colored cardstock.
4. Cut out the egg shapes with scissors.
5. Draw a small chick shape on the colored cardstock.
6. Cut out the chick shape with scissors.
7. Draw a circle on a piece of paper and cut it in half (creating a semicircle).
8. Use the semicircle to cover the front of the disposable paper plate.
9. Insert the chicken, chick, eggs, and raffia into the semicircle and the paper plate.
10. Make two holes in the back of the paper plate and thread a thin string through them.
11. Your lovely Easter paper chicken egg decoration is now complete!
This DIY Easter Paper Chickenproject is perfect for kids and adults alike. You can customize your paper chickens and eggs with different colors and patterns to suit your Easter decor theme. Whether displayed as table centerpieces or hung as festive decorations, these charming creations are sure to add a touch of whimsy to your Easter celebrations. So gather your materials and get ready to craft your way to a hoppy Easter!