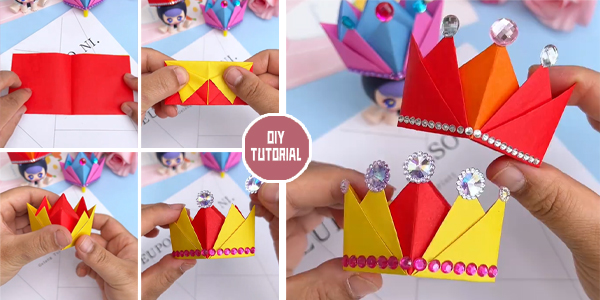
Origami, the ancient Japanese art of paper folding, has captivated hearts and minds for centuries with its simplicity and beauty. From delicate cranes to intricate flowers, origami offers endless possibilities for creativity and expression. In this tutorial, we will explore how to create a stunning origami pearl crown, combining the elegance of pearls with the timeless charm of origami.
Materials Needed for DIY Origami Pearl Crown:
Square paper (preferably pearl or metallic finish)
Pearls or pearl stickers
Glue (if using loose pearls)
Scissors (optional)
Ruler (optional)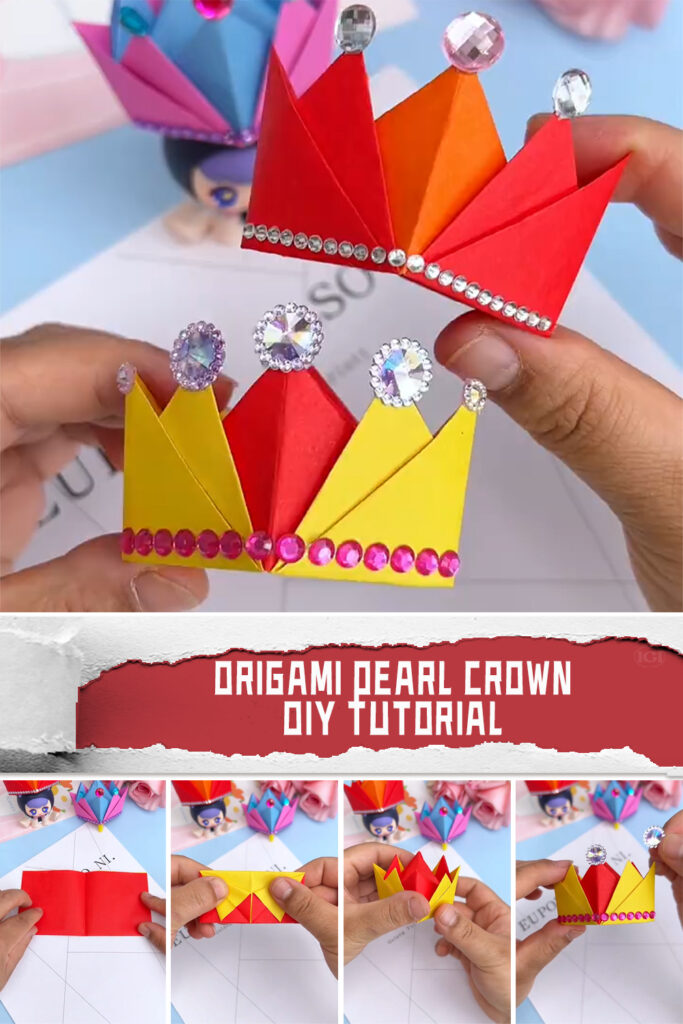
Instruction:
Step 1: Choose Your Paper
Select a square sheet of paper in a color and finish of your choice. Pearl or metallic finish papers work well for creating an elegant crown with a touch of shimmer and sophistication.
Step 2: Fold the Paper
Start by folding the square paper diagonally to form a triangle. Ensure that the edges align perfectly to create a crisp fold.
Step 3: Create Base Folds
Fold the bottom corners of the triangle up to the top corner, creating two smaller triangles. This will serve as the base for your crown.
Step 4: Fold the Side Edges
Fold the left and right edges of the triangle towards the center crease, creating two additional smaller triangles along the sides.
Step 5: Flip and Fold Again
Flip the paper over and fold the bottom edge up towards the top edge, aligning it with the existing crease. This will create a narrow strip of paper along the bottom edge of the crown.
Step 6: Fold Downward
Fold the top layer of the narrow strip downwards, tucking it under the layers of paper to secure it in place. This will form the band of the crown.
Step 7: Decorate with Pearls
Now it’s time to add the finishing touches to your origami pearl crown. If using loose pearls, apply a small dab of glue to the crown and carefully place the pearls in your desired pattern or design. Alternatively, you can use pearl stickers for a quick and mess-free application.
Step 8: Let Dry (If Necessary)
Allow the glue to dry completely before wearing or displaying your origami pearl crown. Once dry, gently adjust the shape of the crown as needed to achieve the desired look.
Step 9: Wear with Pride
Your stunning origami pearl crown is now complete! Wear it with pride for special occasions such as weddings, parties, or photo shoots, or display it as a decorative accent in your home.
Here is the video tutorial for DIY Origami Pearl Crown:
In conclusion, crafting a DIY origami pearl crown offers a delightful blend of creativity and elegance, allowing you to create a one-of-a-kind accessory that is sure to turn heads and spark conversation. Whether you’re a seasoned origami enthusiast or new to the art form, this tutorial provides a simple yet stunning project that anyone can enjoy. So gather your materials, unleash your creativity, and prepare to craft a crown fit for royalty!