
When I was a kid, I used to make pinwheel in the classroom with my classmates. The pinwills made by the students are really colorful! Red, white, green, and purple… At that time, the windmills I made were colored, and I thought my pinwills were the most beautiful, because they were made by my brain.
Now, I also enjoy making little Pinwheels with my kids. Do you believe? Use Q-tips and a small bottle cap to make a small rotating pinwheel, come and try it!

1. First, we draw two circles on the paper. 
2. Draw another small circle in the circle. 
3. Use a crayon to paint your favorite color in the circle. Remember that the small circle in the middle does not need to be painted because it needs to be cut. 
4. Cut out the circle with scissors, and the small circle in the middle. 
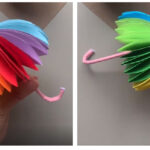
5. Take out 6 Q-tips. and cut in the middle.

6. Apply double-sided tape or glue on the back of the cut circle.

7. Stick the Q-tips you just cut on the circle neatly one by one.


8. The other circle is also stuck to the Q-tips. 
9. We put various colors on the cotton tip of the Q-tips with a watercolor pen. 
10. We prepare a straw and cut a section. 
11. Insert the cut section of the straw into the center of the circle as a bearing. 
12. Then we prepare two Q-tips and glue them together. 
13. Put the glued cotton swabs through the bearing. 
14. Glue a Q-tips on the other side as well. 
15. We prepare a bottle cap and put some plasticine inside the bottle cap as a base. 
16. Insert the assembled windmill into the plasticine.
17. In this way, our handmade small windmill is completed. Enjoy!


[…] YOU MAY LIKE: DIY Adorable Pinwheel with Q-tips Tutorial […]